Easy Garlic Naan Recipe (No Yeast) — Stovetop, Oven & Air Fryer
Soft, fluffy garlic naan made without yeast — ready in 20 minutes with just 5 pantry ingredients. A double garlic layer gives you real restaurant-style flavour: garlic powder baked into the dough, then fresh garlic butter brushed on immediately after cooking. Three methods covered — stovetop tawa for the most authentic blistered result, oven for batch cooking, and air fryer for the crispiest naan texture at home.
Print
Pin
Servings: 6 Persons
Calories: 290kcal
Equipment
- Iron Skillet
Ingredients
Naan Dough (No Yeast)
- 3 cups all-purpose flour (maida) Use standard unbleached all-purpose flour. Avoid bread flour — its higher protein content makes naan tough and chewy rather than soft and pliable.
- ⅓ teaspoon baking soda The leavening agent — reacts with the yogurt's acidity to create irregular carbon dioxide bubbles, giving naan its authentic uneven puff. Do not substitute with baking powder.
- ⅓ teaspoon garlic Powder Goes into the dough for background garlic warmth throughout every bite. This is Layer 1 of the double garlic system — subtle, baked-in, present in every mouthful.
- 1 tablespoon plain full-fat yogurt Does three jobs: activates the baking soda, adds mild tang, and tenderises the gluten strands. Full-fat only — low-fat yogurt has less acidity and the baking soda reaction is weaker. Don't substitute with Greek yogurt unless thinned with 1 tablespoon water.
- 1 tablespoon oil (vegetable or neutral) Coats the gluten strands and keeps the naan soft and pliable. Do not reduce — this is what prevents the naan from cracking or going hard after cooking.
- ½ teaspoon salt Always add to the flour first — never drop directly onto the yogurt or oil before mixing, as high salt concentration inhibits the baking soda reaction.
- ⅓ cup warm water, added gradually Add while kneading — 1 tablespoon at a time — until the dough is soft and slightly tacky. The exact amount varies by flour brand and kitchen humidity. You may need anywhere from 80ml to 120ml.
Garlic Butter Topping (make while first naan cooks)
- 2 tablespoons unsalted butter, melted The carrier for the garlic and herb topping. Brush on immediately while the naan is steaming hot — the heat from the naan gently cooks the raw garlic and melts the butter into the surface simultaneously.
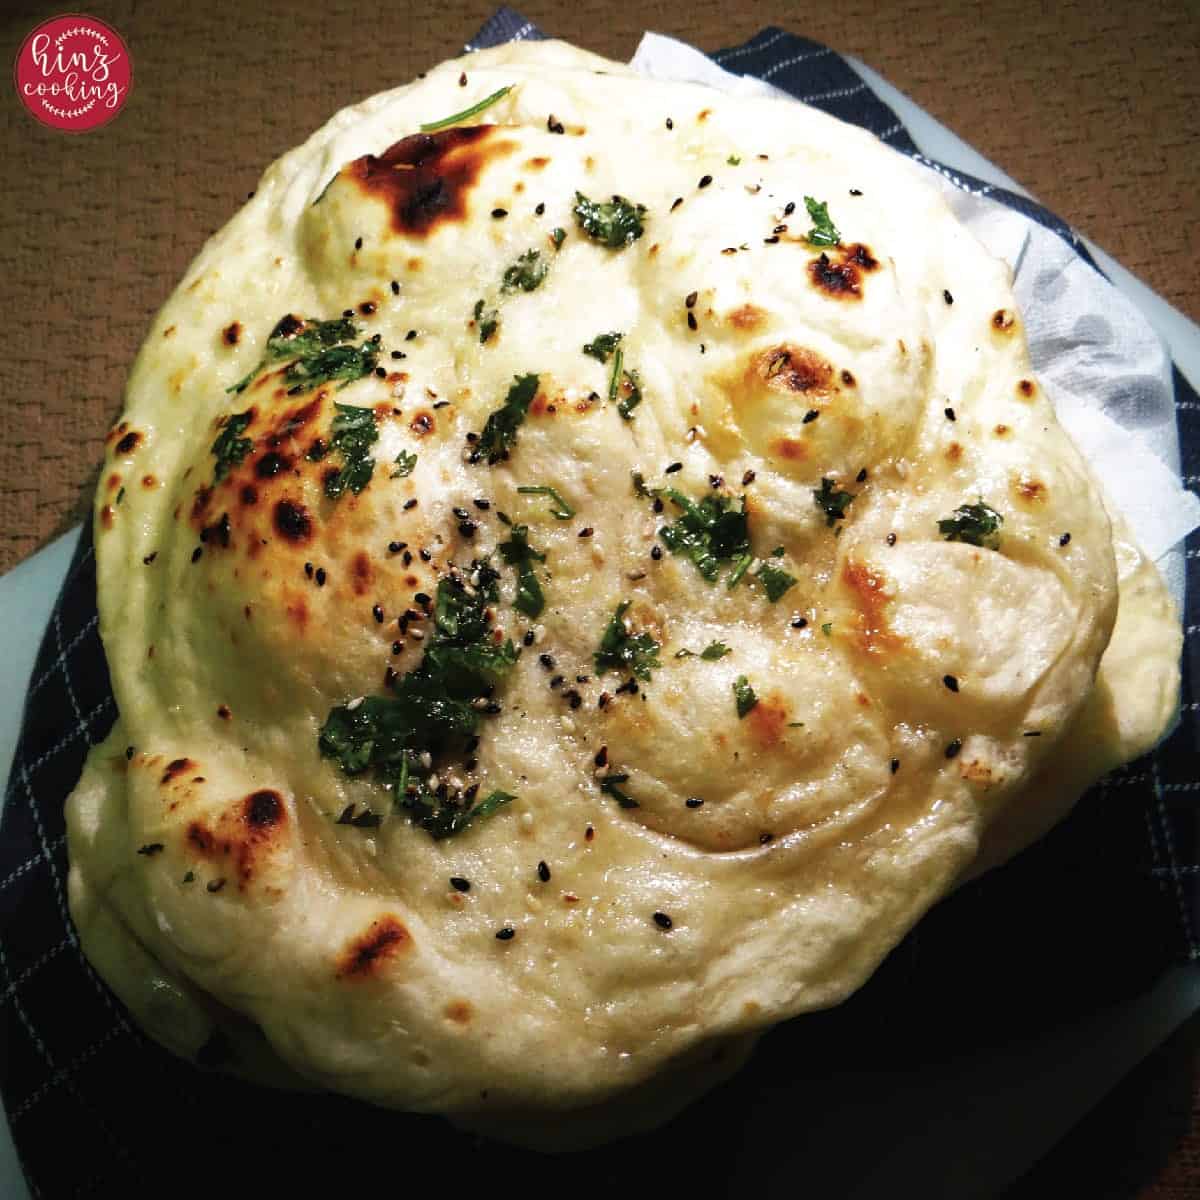
- ½ teaspoon fresh garlic, finely grated Layer 2 of the double garlic system — fresh grated garlic in the butter gives the sharp, pungent top note that makes garlic naan smell and taste like it came from a restaurant. Always freshly grated — jarred garlic doesn't have the same aroma.
- 1 tablespoon fresh coriander (cilantro), finely chopped Mixed into the butter and brushed on at the end. Adds freshness, colour, and herbal contrast to the richness of the butter. Always add to the butter — never sprinkle dry on the cooked naan, it dries out immediately.
- ½ teaspoon sesame (Black & White) this quantity of sesame required or every naan.
For Cooking
- as needed water (for wetting naan underside) A few drops brushed or patted onto one side of the shaped naan before cooking. The wet side goes down against the hot surface — the moisture creates an initial steam burst that puffs the dough from the inside while the top blisters. Used for all three methods.
- light spray oil (for air fryer basket / oven tray only) Stovetop method: no oil needed on the pan. Oven method: brush on tray before placing naan. Air fryer method: light spray on basket before preheating. Prevents sticking in all three non-stovetop methods.
Instructions
Make the dough
- Mix the dry ingredients:In a large mixing bowl, combine all-purpose flour, baking soda, garlic powder, and salt. Whisk briefly to distribute the baking soda and garlic powder evenly through the flour. Uneven baking soda creates bitter spots in the finished naan — this 30-second step prevents that.
- Add yogurt and oil:Add the yogurt and oil to the flour mixture. Using your hands, crumble and work everything together until it resembles rough breadcrumbs — this pre-mixing ensures the fat and acid are distributed before you add water, which makes the final kneading faster and more even.
- Add water and knead:Add warm water gradually — 1 tablespoon at a time — while kneading. Continue until a soft, slightly tacky dough forms. Knead for 5–6 minutes until completely smooth and elastic. The dough should spring back slowly when you press it with a finger. If sticky, add flour one teaspoon at a time. If stiff, add warm water one teaspoon at a time.
- Rest for 2 hours:Lightly coat the dough ball with oil, place in the bowl, and cover tightly with plastic wrap or a damp kitchen towel. Rest in a warm, draught-free spot for 2 hours minimum. A switched-off microwave or oven with just the light on is ideal.
- Make the garlic butter:While the first naan is cooking, melt butter in a small bowl. Add freshly grated garlic and finely chopped coriander. Stir together. The butter's residual heat begins softening the raw garlic — by the time you brush it on the hot naan, it will be aromatic rather than harsh. Keep warm.
The dough should feel softer than you expect — almost a little sticky. This softness is what produces soft naan. Resist adding extra flour beyond what's needed to handle it.
Why 2 hours matters without yeast: the baking soda and yogurt reaction continues slowly during the rest, developing more carbon dioxide. The gluten strands relax — making the dough effortlessly easy to roll and the finished naan noticeably more tender. My early attempts used a 20-minute rest. The difference between 20 minutes and 2 hours is significant. Overnight in the fridge is even better — that's the best version of this recipe.
Shape the naans
- Divide and rest:After resting, turn dough onto a lightly floured surface and knead gently for 2 minutes. Divide into 6 equal portions and roll each into a smooth ball. Cover the balls you're not using immediately with a damp cloth — they dry out and skin over within minutes of being exposed to air.
- Shape each naan:Using your hands (preferred) or a rolling pin, flatten each ball into an oval or teardrop shape — approximately 8–9 inches long and ¼ inch thick. Hand-stretching by rotating the dough gives an irregular, authentic surface. Press the dimple pattern firmly across the surface using all fingertips — watch the video for the exact technique.
- Wet the underside:Pat or brush a few drops of water onto one side of the shaped naan — this becomes the side that goes against the hot surface. The moisture creates an initial burst of steam that puffs the dough from the inside while the top blisters and chars from the heat above. Use for all three cooking methods.
Irregular shapes are traditional — street naan is never perfectly round. The uneven thickness creates contrast between chewy thick areas and crispy thin edges.
Cook (choose your method)
Stovetop / Tawa — most authentic result
- Heat the skillet for 3–4 minutes:Place your cast iron skillet or heavy tawa over high heat for 3–4 minutes until very hot. Test by holding your hand 5cm above — you should feel strong radiant heat immediately. A lukewarm pan gives pale, flat naan. No oil on the pan.
- Cook first side — 60–90 seconds:Place naan wet-side down onto the hot dry skillet. Press lightly with the back of a spoon for the first 10 seconds to ensure full contact. Cook for 60–90 seconds — you'll see bubbles forming across the surface and the edges changing from translucent to opaque. The underside will have golden-brown spots.
- Cook second side — flip method (non-stick / induction):Flip the naan and cook the second side uncovered for 1–2 minutes until golden spots appear. For extra puff, cover with a lid for the last 30 seconds.
- Cook second side — inverted skillet over flame (cast iron / gas only):Using thick oven gloves, grip the cast iron skillet handles and flip it upside down over the gas flame, holding the naan against the pan with tongs. Rotate slowly over the flame for 30–60 seconds until the surface blisters and chars in spots. Return upright and remove naan immediately with tongs.
- Garlic butter finishBrush immediately and generously with garlic butter the moment the naan comes off the skillet. The heat from the naan melts the butter in and gently cooks the fresh garlic — the whole naan becomes glossy, fragrant, and soft. Cover with a clean kitchen towel while you cook the remaining naans.
Cast iron only — never invert non-stick pans over direct flame. Naan is secured by moisture — it won't fall unless you shake the pan. Move confidently and keep gloves on throughout.
Serve within 5 minutes of cooking. Stovetop naan is at its best fresh — the blistered surface softens quickly once covered.
Oven method — best for batches
- Preheat oven to maximum temperature:Set your oven to its highest temperature — usually 475–500°F (245–260°C). Place a heavy baking tray or pizza stone inside to preheat for at least 15 minutes. The tray must be screaming hot before the naan goes on — this mimics the immediate intense heat of a tawa and is what creates the puff.
- Bake 5–6 minutesCarefully slide the shaped naan (wet-side down) directly onto the hot tray or stone. Bake for 5–6 minutes until puffed and golden with some darker spots. For char blisters, switch to broil/grill for the final 60–90 seconds — watch constantly.
- Garlic butter finishBrush with garlic butter immediately on removal from the oven. Cover with a kitchen towel and continue with remaining naans. The oven method gives a slightly drier surface than the skillet — be slightly more generous with the butter to compensate.
You can fit 2–3 naans on a standard tray simultaneously — the main advantage of the oven method for larger households.
Air Fryer — crispiest result
- Preheat air fryer to 190°C (375°F):Preheat for 2–3 minutes. Lightly spray or brush the basket with oil. Skipping the preheat means the naan sticks to a cold basket and the base doesn't get the immediate heat burst needed to create the blistered surface and internal puff.
- Check basket clearance:Place the shaped naan in the basket wet-side down before switching on the air fryer. Check that there is at least 3–4cm of clearance between the top surface of the naan and the heating element above. Garlic naan without yeast puffs significantly — more than you expect. In smaller 2–3 litre air fryers, make naans 6 inches rather than 8–9 inches to ensure clearance.
- Air fry 4–5 minutes at 190°C:Cook at 190°C (375°F) for 4–5 minutes. Do not open the basket in the first 3 minutes — the pressure and heat build-up during this period is what creates the internal puff and surface blisters. After 3 minutes, check: the naan should be visibly puffed with golden patches. If still pale, continue for 1 more minute. The finished naan should be golden to dark golden on the surface with some darker blistered spots.
- Garlic butter finish immediately:Remove from basket and brush immediately with garlic butter while piping hot. The air fryer naan surface is noticeably crispier than the other methods — if you prefer it slightly softer, wrap in a clean kitchen towel for 90 seconds after buttering. The trapped steam softens the exterior slightly while keeping the interior fluffy.
Best method for 1–2 naans quickly. Produces the crispiest exterior surface of all three methods — blistered, slightly crunchy shell with a completely fluffy interior. The intense circulating heat is the closest to a tandoor any home appliance can get.
If the naan touches the heating element during cooking, it burns the top surface while the base remains undercooked. Always check clearance before starting.
For maximum char marks like a tandoor: increase temperature to 200°C (390°F) for the last 60 seconds only.If the naan puffs into a full balloon shape (completely hollow inside): this is normal and happens when one area of dough is slightly thinner. The flavor is identical — press gently with a clean cloth when it comes out and it flattens back perfectly.
💡 Hina's Air Fryer Note: I tested this at 180°C, 190°C, and 200°C. 190°C is the sweet spot — hot enough to blister and char without burning the garlic butter that soaks in at the end. 200°C gives slightly more char but needs very close watching in the final minute. 180°C is safe but gives a paler, softer result closer to the oven method.
Video
Notes
Why this recipe skips baking powder: I tested both. Baking powder creates a uniform, cakey rise throughout the dough. Baking soda reacts specifically with the yogurt's acidity, creating irregular carbon dioxide pockets — the uneven bubbles and blisters that are the signature of authentic naan. The texture with baking soda is chewy and open; with baking powder it's uniform and soft like a cake. Baking soda is correct for naan.
The 2-hour rest is not optional: the minimum is 20 minutes but the 2-hour version is noticeably better — more flavorful, easier to roll, more tender result. Overnight in the fridge is the best version of this recipe. The slow rest allows the gluten to fully relax and the baking soda reaction to develop more thoroughly.
Why my naan turned out hard: most commonly caused by — too much flour added during rolling (keep dusting minimal), skillet or air fryer not hot enough before naan went in, dough rested less than 20 minutes, or naan left uncovered after cooking. Cover all cooked naans immediately with a clean kitchen towel to trap steam and keep them soft.
Air fryer size matters: standard 4–6 liter air fryers fit one full-size naan (8–9 inches) with adequate clearance. Larger 8–10 liter models fit two. For small 2–3 liter air fryers, make 6-inch naans — same recipe and timing, just smaller portions.
Kefir substitution: milk kefir works in place of yogurt — use the same quantity. The acidity level is similar, the baking soda reaction is equally effective, and the result is excellent. Reader Ashley tested this on a cast iron wok and described the result as "exactly like authentic restaurant naan."
Make-ahead dough: make the dough, complete the 2-hour rest, divide into balls, coat lightly with oil, wrap each in plastic wrap, and refrigerate up to 3 days or freeze up to 2 months. Thaw overnight in the fridge. Rest at room temperature 30 minutes before rolling. Cold-rested dough makes the most flavorful naan — the extended fermentation develops depth you can't replicate in 2 hours.
Storage and reheating: wrap cooled naans in foil. Room temperature: 1 day. Refrigerator: 3 days. Reheat on a dry hot skillet for 60 seconds per side with a small knob of butter — restores the surface texture far better than a microwave. Air fryer reheat: 160°C for 2 minutes gives an almost fresh result.
Garlic butter variations: add a pinch of chili flakes to the butter for a spicy garlic version. Swap coriander for fresh mint for a different herbal note. Add a tiny pinch of smoked paprika to the butter for color and a subtle smoky depth. All tested and approved in my Dubai kitchen.
Nutrition
Serving: 1naan | Calories: 290kcal | Carbohydrates: 490g | Protein: 7g | Fat: 6g | Saturated Fat: 2g | Cholesterol: 10mg | Sodium: 280mg | Fiber: 2g | Sugar: 1g
