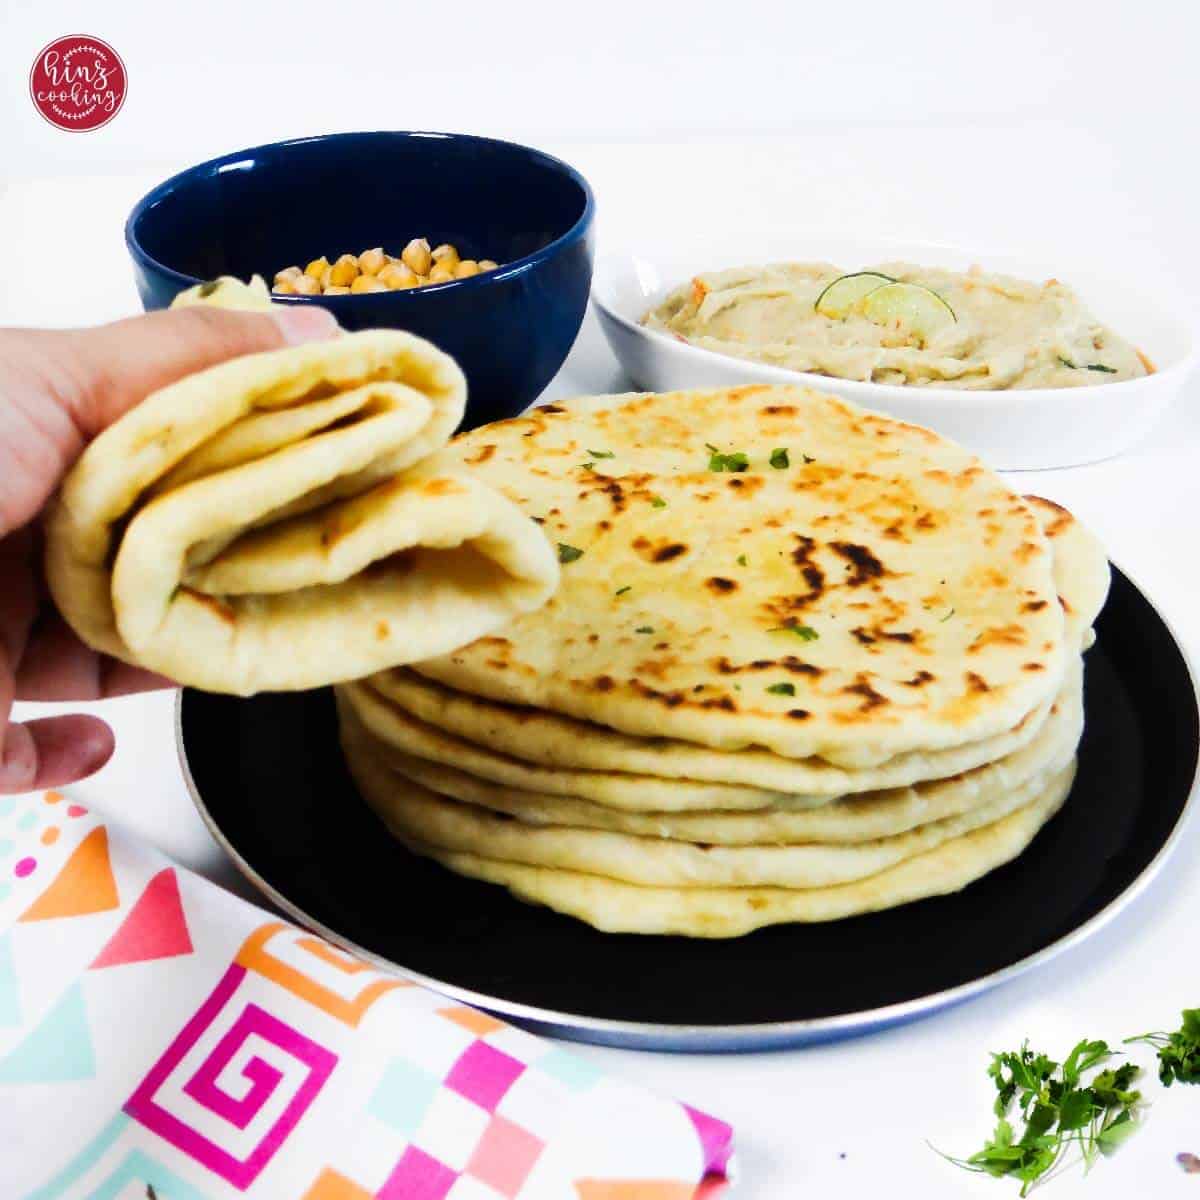
This is the garlic naan recipe I've been making in my Dubai kitchen for years — and the one my family requests more than anything else I cook. No yeast, no tandoor, no long proofing time. Just five pantry ingredients, a cast iron skillet, and 20 minutes between you and the best homemade naan bread you've ever had.
The secret to making it soft, pillowy, and covered in those beautiful charred bubbles — just like Indian restaurant naan — isn't a tandoor. It's a combination of yogurt in the dough and a very hot iron skillet. I'll show you exactly how to get it right across all three methods — stovetop tawa for the most authentic blistered result, oven for cooking a batch at once, and air fryer for the crispiest naan surface you can make at home without a tandoor.
Once you've made this homemade garlic naan, you'll understand why my family refuses to order takeout naan anymore.
I've been experimenting with naan dough for years, and my first attempts were honestly disappointing — flat, dense, and nothing like what I wanted. The turning point was two discoveries: resting the dough for at least 2 hours (not just 20 minutes), and skipping baking powder entirely. I'll explain why baking powder is actually the enemy of authentic naan texture in the tips section below. Every tip in this recipe comes from a real mistake I made first.
New to this recipe? The stovetop method is the most authentic. In a hurry with only a couple of naans to make? The air fryer is faster and gives a crispier result than the oven. All three methods use exactly the same dough — you choose the method based on your kitchen and preference. Jump to whichever section suits you.
Watch Recipe:
Jump to:
- What is Garlic Naan?
- Why You'll Love This Recipe
- Ingredients & Their Purpose
- How to Make Garlic Naan Without Yeast — Step by Step
- Pro Tips — How to Make Soft and Fluffy Garlic Naan Every Time
- How This Garlic Naan Tastes (So You Know You've Got It Right)
- What to Serve with Garlic Naan — Best Pairings
- How to Store, Freeze and Reheat Garlic Naan
- Frequently Asked Questions
- More Naan Recipes
- Easy Garlic Naan Recipe (No Yeast) — Stovetop, Oven & Air Fryer
What is Garlic Naan?
Garlic naan is a soft, leavened Indian-style flatbread made from white flour, yogurt, and — in this version — no yeast. It's traditionally cooked in a tandoor (a cylindrical clay oven that reaches up to 900°F), which gives it those signature charred bubbles and the slightly smoky edge you get at Indian and Pakistani restaurants.
At home, you don't need a tandoor. A cast iron skillet or heavy tawa replicates the high, direct heat that creates those bubbles — especially when you use the inverted skillet technique over a gas flame, which I'll walk you through step by step.
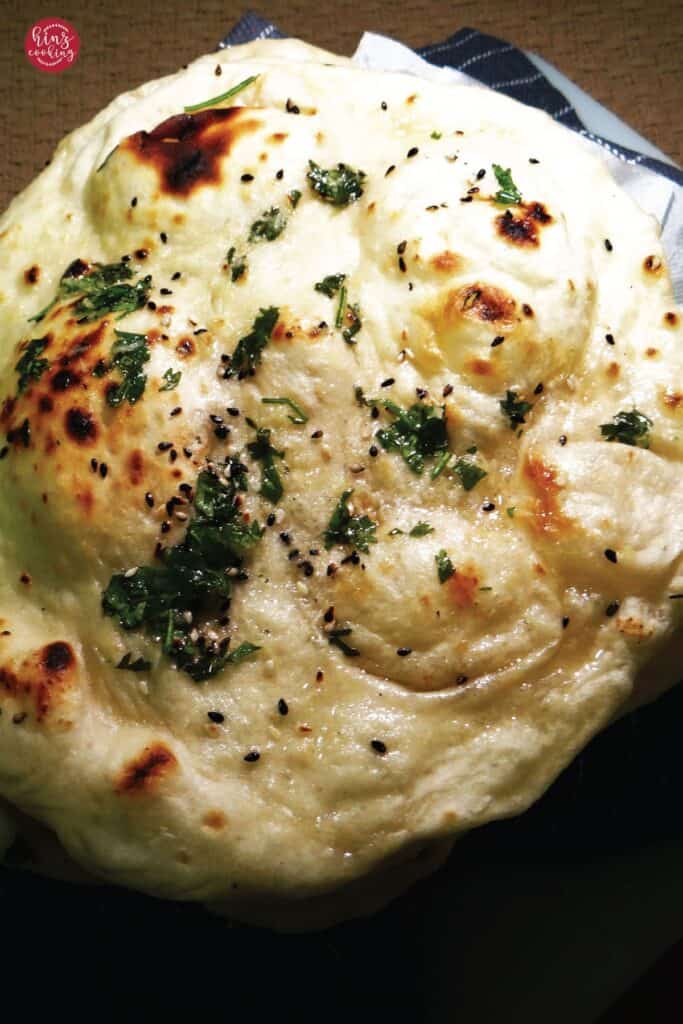
The garlic element is two-layered: garlic powder goes into the dough for a background warmth, and freshly grated garlic cooked into butter gets brushed over the naan the moment it comes off the heat. That second layer is what makes garlic naan taste like restaurant garlic naan — and most homemade recipes skip it.
No gas stove? Scroll to the oven method section below — it works beautifully in a regular kitchen oven too.
Why You'll Love This Recipe
- No yeast — ready in 20 minutes: The yogurt and baking soda do all the leavening work. No proofing, no waiting, no watching a dough slowly (or not) rise.
- The exact texture of restaurant naan: Slightly chewy at the edges, pillowy-soft in the center, with irregular charred blisters on the surface — not a smooth, uniform flatbread.
- 5 ingredients you already have: Flour, salt, baking soda, oil, yogurt. The garlic butter topping uses fresh garlic, butter, and coriander. Nothing specialist needed.
- Works on stovetop or in the oven: Full instructions for both. Cast iron skillet for the most authentic result; oven method for electric or induction kitchens.
- Better than takeout — proven by my family: My kids can tell the difference between fresh homemade and reheated restaurant naan. They always ask for this.
Ingredients & Their Purpose
All-Purpose Flour (3 cups / 375g) The foundation. All-purpose flour has the right protein level to create a dough that's both soft enough to be pillowy and strong enough to hold the air bubbles that form during cooking. Don't substitute bread flour — its higher protein content makes naan tough and chewy in the wrong way.
Baking Soda (⅓ tsp) The leavening agent. It reacts with the acidity in the yogurt to create irregular carbon dioxide bubbles — which is exactly what gives authentic naan its uneven, organic puff. I tested this recipe with baking powder too and found it created a more uniform, cake-like rise. Baking soda gives you the correct chewy, blistered texture. Skip the baking powder.
Yogurt (1 tbsp, full-fat) Does three jobs: activates the baking soda, adds mild tang, and tenderises the gluten strands so the dough stays soft and pliable. If you don't have yogurt, reader Ashley tested this recipe with milk kefir and got excellent results — the acidity level is similar.
Oil (1 tbsp) Keeps the dough from drying out during the rest period and adds a subtle richness to the finished naan. Vegetable oil works well; ghee gives a more traditional South Asian flavour.
Salt (½ tsp) Balances the flavour and controls how fast the dough ferments during the rest period. Add it to the flour — never directly to the yogurt or oil.
Water (100ml / ~⅓ cup, warm) Add gradually — the exact amount depends on your flour brand and kitchen humidity. The dough should feel soft and slightly tacky, like an earlobe. Not sticky, not stiff.
For the Garlic Butter Topping: 2 tablespoon melted butter + ½ teaspoon freshly grated garlic + 1 tablespoon fresh coriander (cilantro), finely chopped. Make this while the first naan is cooking so it's ready to brush on immediately.
How to Make Garlic Naan Without Yeast — Step by Step
Step 1 — Make the dough
In a large mixing bowl, combine the flour, salt, baking soda, and garlic powder. Whisk briefly so the baking soda distributes evenly — this matters because uneven baking soda creates bitter spots.
Add the yogurt and oil and crumble everything together with your hands until it resembles rough breadcrumbs. Now add the warm water gradually — a tablespoon at a time — kneading as you go. Work the dough for 5–6 minutes until it's smooth, soft, and slightly tacky. It should spring back slowly when you poke it.
Hina's Note: Soft dough = soft naan. If the dough feels stiff or dry, add water one teaspoon at a time. Resist adding more flour — a tighter dough makes tougher naan.
Step 2 — Rest the dough
This is the step most recipes underestimate. Cover the bowl tightly with plastic wrap or a damp towel and leave in a warm, draught-free spot for at least 2 hours. Overnight in the fridge is even better — the slow, cold rest develops a deeper flavour.
Minimum: 20 minutes if you're short on time. But the naan will taste noticeably better at 2 hours.
Why does resting matter without yeast? The gluten strands relax and the yogurt continues its gentle leavening reaction. The dough becomes easier to roll and the surface develops more complex flavor. My early naan attempts were flat and bland because I rushed this step.
Step 3 — Roll and prep
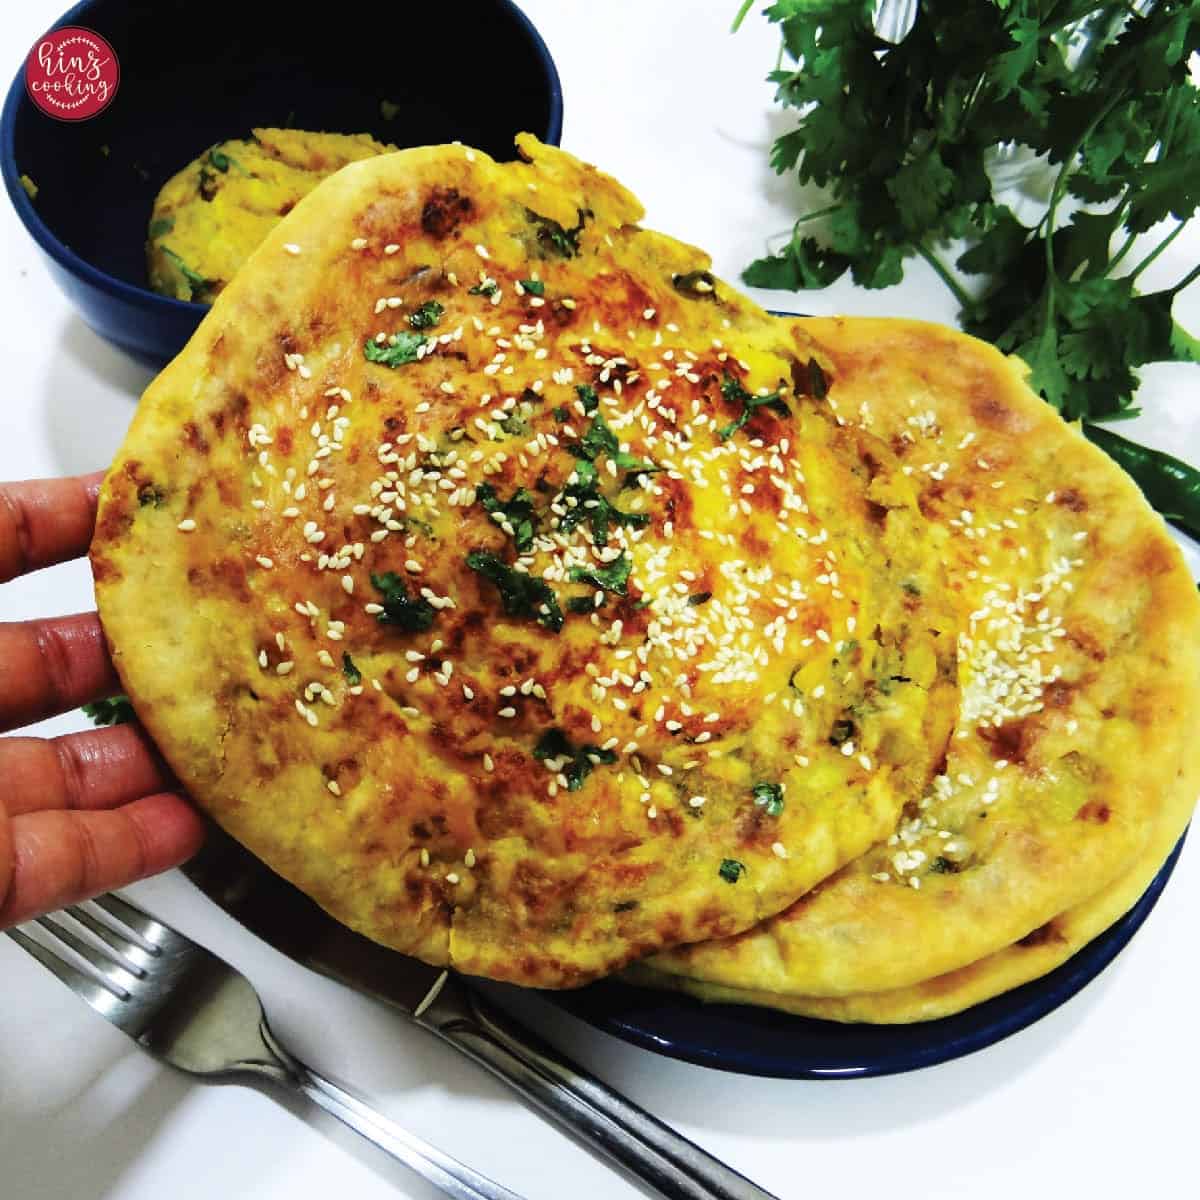
After resting, turn the dough onto a lightly floured surface and knead for 2 minutes. Divide into 6 equal portions. Using your hands or a rolling pin, shape each portion into an oval or teardrop shape — roughly 8 inches long and ¼ inch thick.
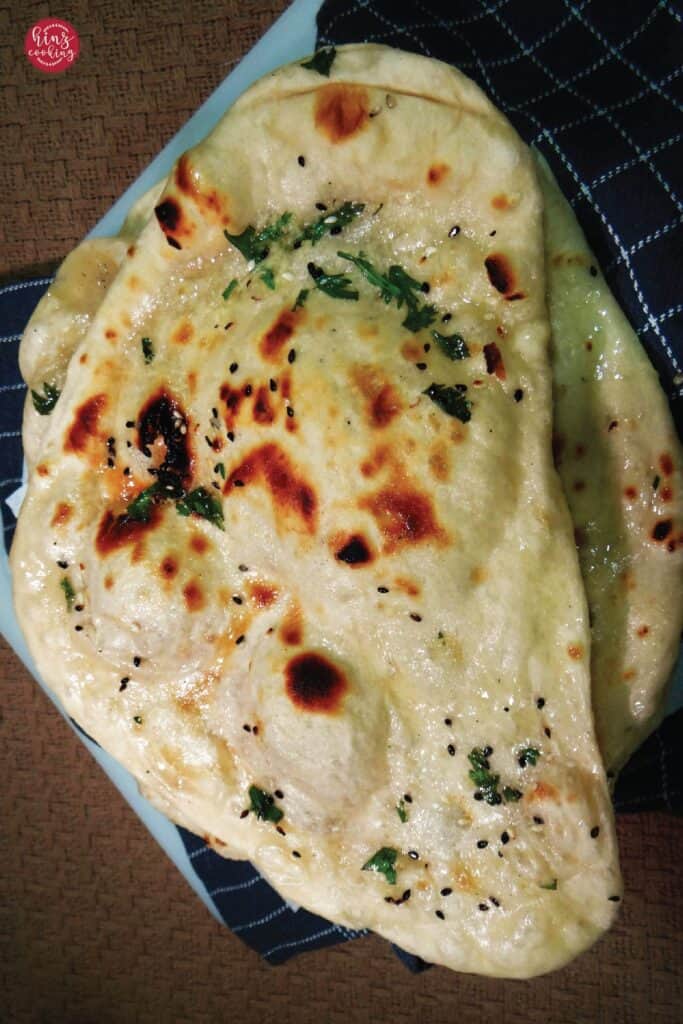
Sprinkle sesame seeds (white and black) over the surface and press lightly with your palm to embed them. Lightly moisten the underside of each naan with a few drops of water — this helps it grip the hot skillet.
Step 4 — Cook on stovetop (two methods)
🔥 Method A: Inverted Cast Iron Skillet (Traditional — best result)
This is how naan gets those beautiful, irregular charred bubbles — and it's simpler than it looks.
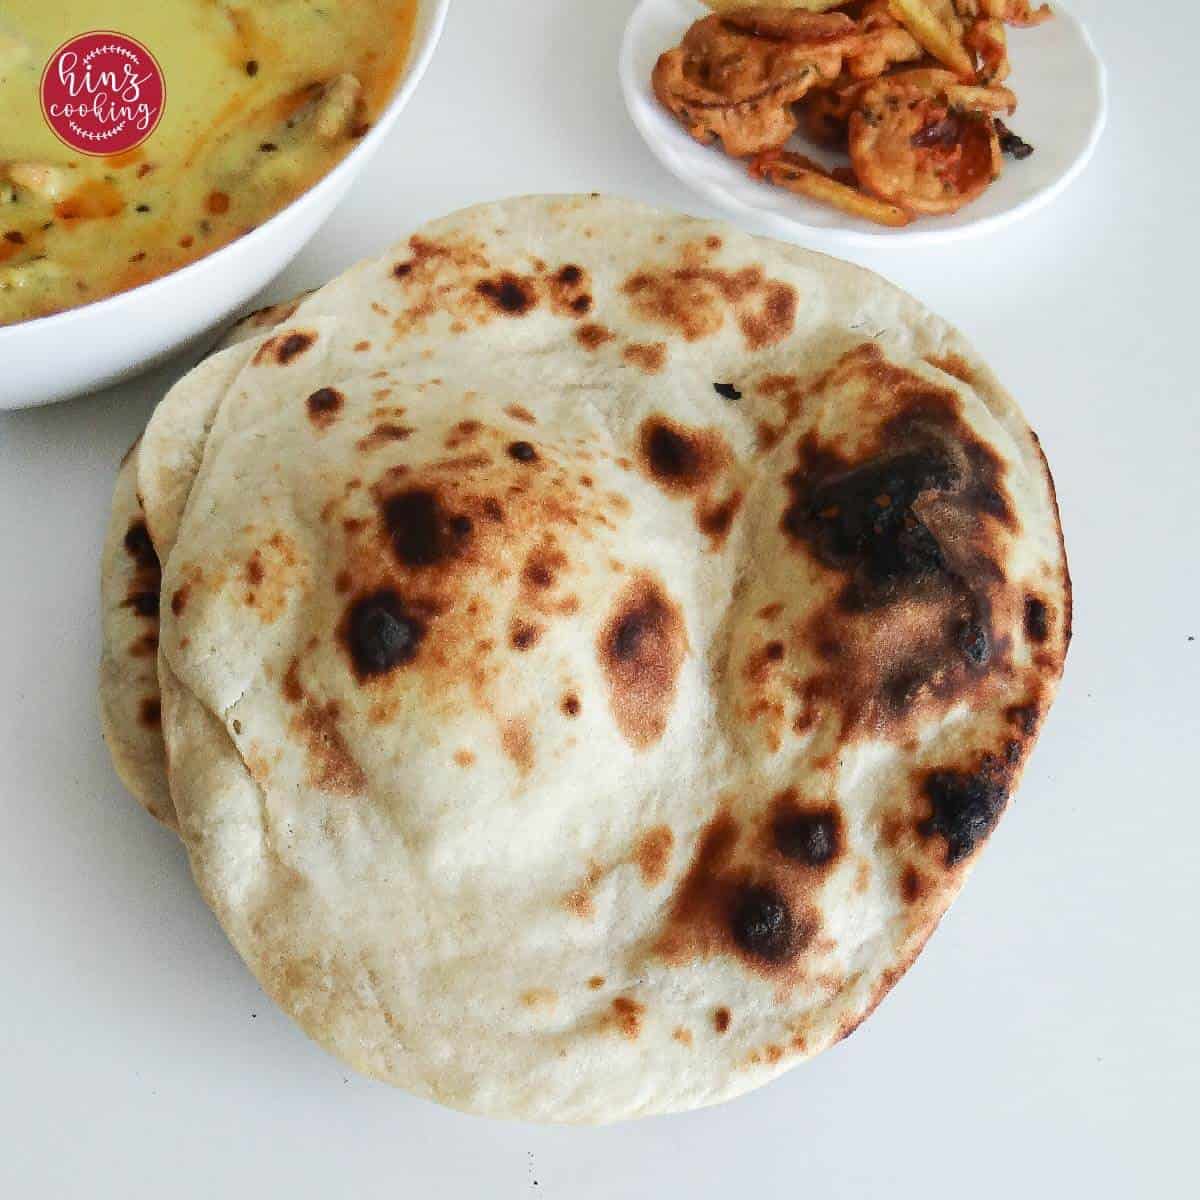
Heat a cast iron skillet or heavy iron tawa over high heat for 3–4 minutes until very hot. Do not add oil. Place one naan onto the dry skillet, water side down, and press lightly with the back of a spoon.
Cook for 60–90 seconds until bubbles start to form across the surface and the underside has golden-brown spots. Now — using thick oven mitts or tongs — flip the entire skillet upside down over the gas flame, holding the naan against the skillet with tongs. Rotate slowly over the flame for 30–60 seconds until the surface blisters and chars in spots.
Safety note: This only works safely with a cast iron skillet — it retains heat without warping. Keep your hands protected. The naan is secured to the skillet by the moisture from the dough — it won't fall unless you shake it. Use tongs, not bare hands.
Remove the skillet from flame, return it upright, and lift the naan off with tongs.
🍳 Method B: Both sides on the skillet (No-flip — works on any hob)
If you have an electric or induction hob, or prefer not to invert the pan: heat the skillet on high, place naan water side down, cover with a lid for 2 minutes until the surface puffs and the underside is golden. Flip and cook uncovered for 1–2 minutes on the second side until charred spots appear. This is Ashley's method — she used a cast iron wok on an electric hob and called the result "exactly like an authentic restaurant."
Step 5 — Make the garlic butter
While the first naan is cooking, combine the melted butter, freshly grated garlic, and finely chopped coriander (cilantro) in a small bowl. Stir together — the heat from the butter will gently cook the raw garlic, mellowing its sharpness.
Step 6 — Brush and serve immediately
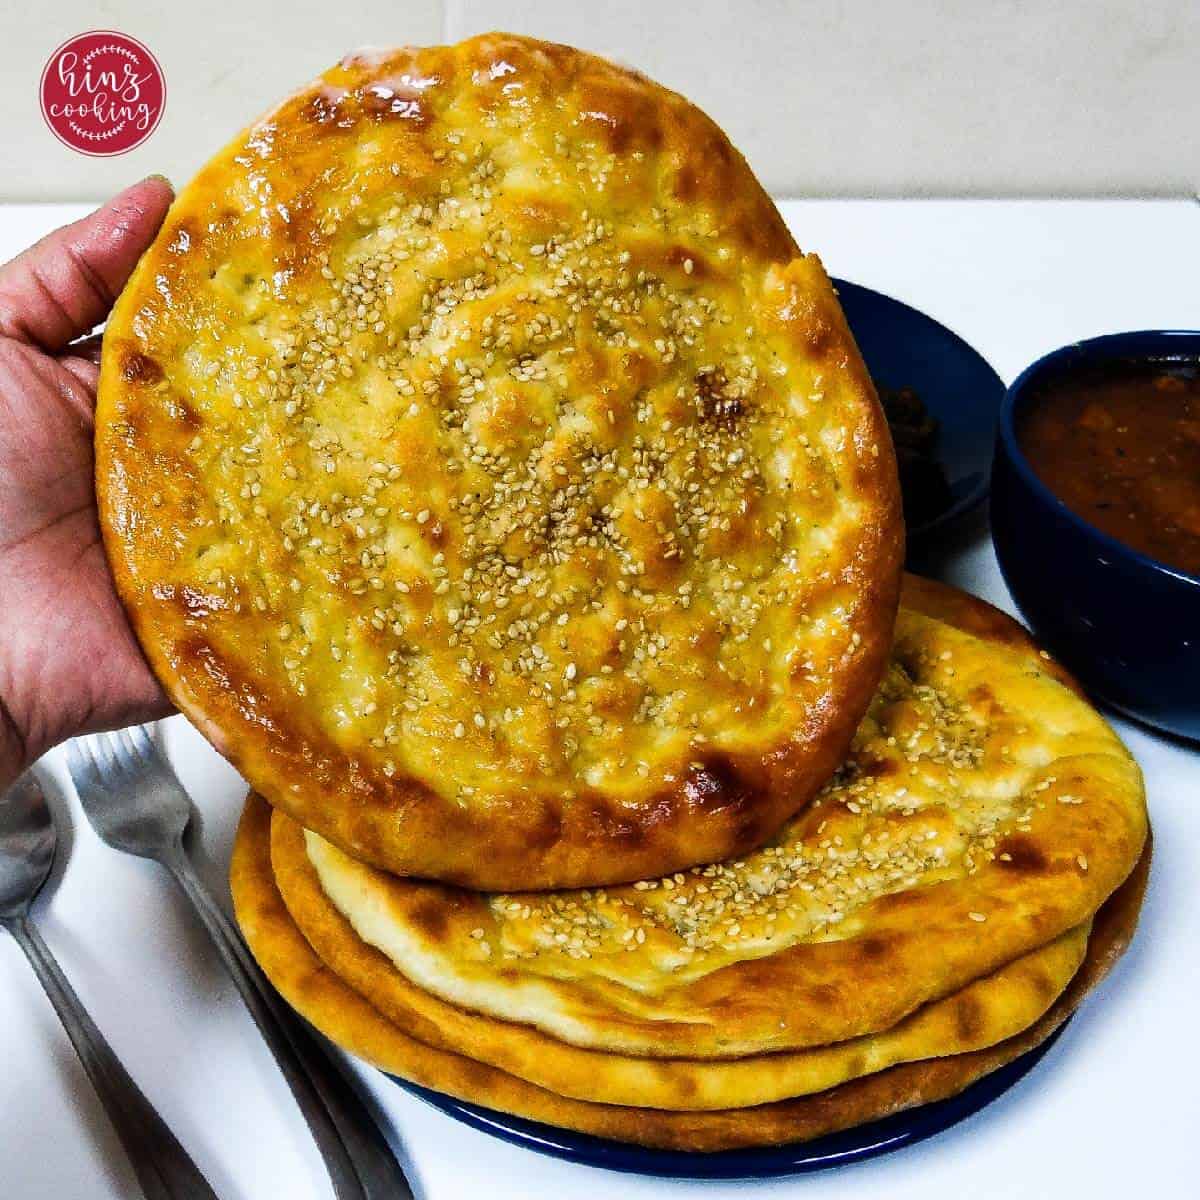
The moment each naan comes off the heat, brush it generously with the garlic butter. The heat of the bread absorbs the butter into the surface, making it glossy, fragrant, and soft. Stack naans on a plate and cover with a clean kitchen towel to keep them warm and pliable while you cook the rest.
Eat within 10 minutes of cooking. This is when garlic naan is at its absolute best — the surface is slightly crisp, the interior is pillowy, and the garlic butter is still fragrant. This is what restaurant naan is trying to replicate.
Oven Method — For Electric & Induction Kitchens
Preheat your oven to its maximum temperature (usually 475–500°F / 245–260°C) with a heavy baking tray or pizza stone inside for at least 15 minutes — the tray must be scorching hot. This mimics the immediate high heat of the tawa.
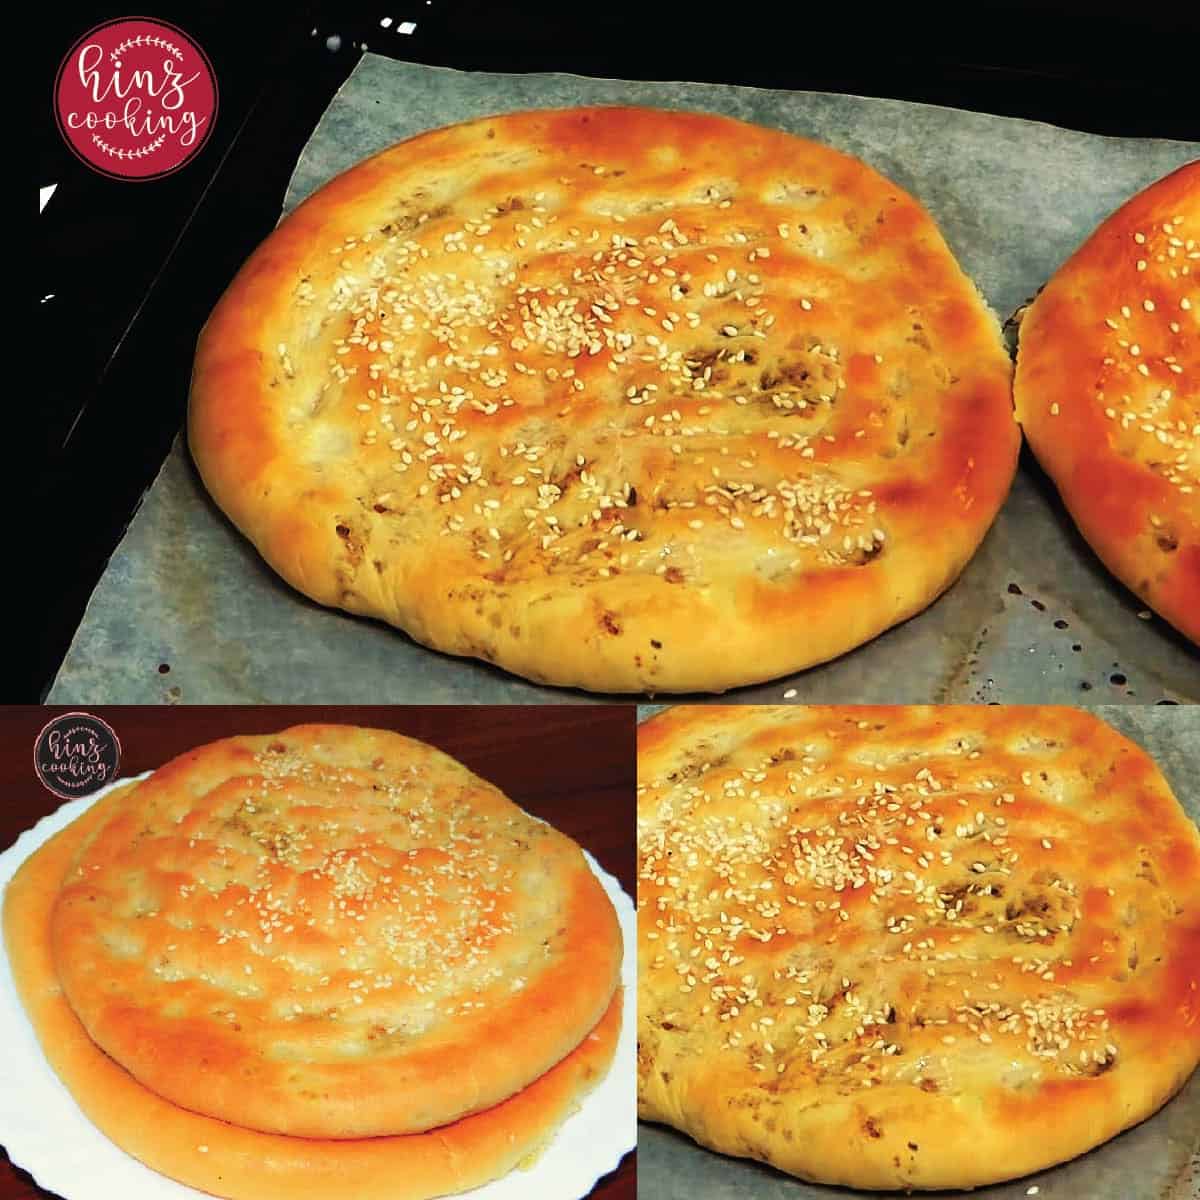
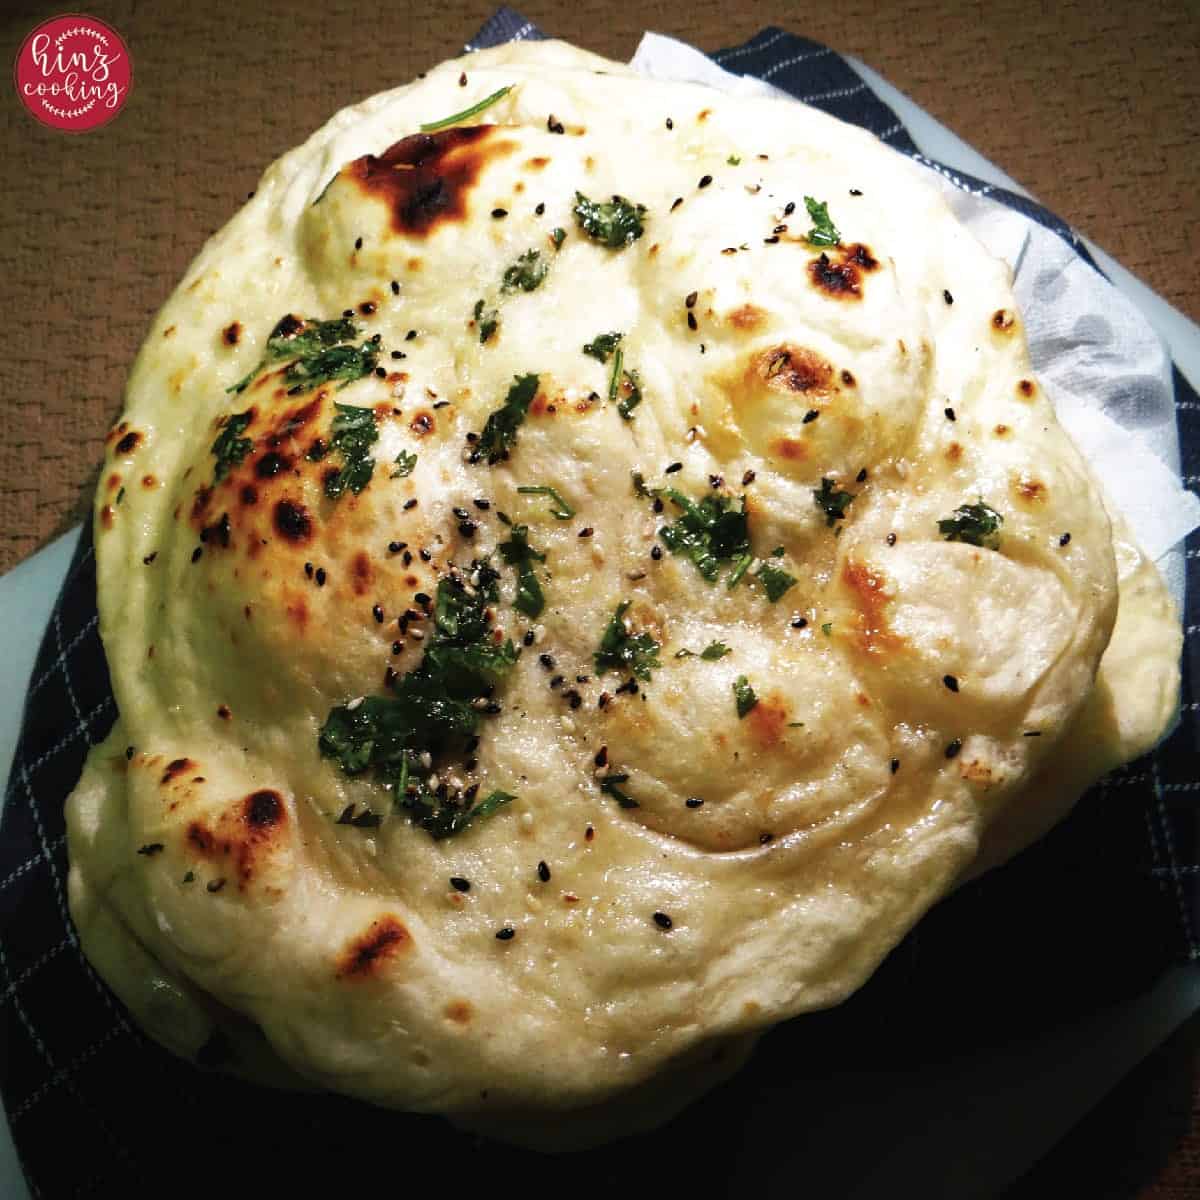
Carefully slide the shaped, sesame-topped naan directly onto the hot tray. Bake for 5–6 minutes until puffed and golden with some darker spots. For charred blisters, switch to the broiler/grill for the final 60–90 seconds — watch constantly.
Brush with garlic butter immediately on removal from the oven.
The oven method gives a slightly drier surface than the skillet — both are delicious, but the skillet version is closer to tandoor naan.
Air Fryer Garlic Naan — Crispiest Result at Home
The air fryer is my favourite method when I'm making garlic naan for just two people — it is faster than the oven, needs no large pan to heat, and produces the crispiest naan surface of any home cooking method. The intense circulating hot air creates surface blisters almost identical to a tandoor — that charred, slightly crunchy exterior that makes restaurant naan so satisfying is exactly what you get here. The inside stays completely soft and fluffy.
The one thing to know about air frying naan without yeast: the dough puffs quickly and dramatically. Make sure there is at least 3–4cm of clearance between the top of the naan and the heating element before you close the basket. In most standard air fryers (4–6 litre) you can fit one full-sized naan comfortably; in larger models, two.
How to Make Garlic Naan in the Air Fryer — Step by Step
Temperature: 190°C (375°F) | Time: 4–5 minutes per naan | No oil needed
Step 1 — Preheat: Preheat air fryer to 190°C (375°F) for 2–3 minutes. Lightly spray or brush the basket with oil. Preheating is essential — a cold basket start means the naan sticks and the base doesn't get the immediate heat burst that creates the blistered surface.
Step 2 — Shape as normal: Shape your garlic naan exactly as you would for the stovetop or oven method. Roll or stretch to 8–9 inches, press dimples with fingertips, wet the underside lightly with water. The wet side goes down in the basket — the moisture creates an initial burst of steam that puffs the dough from the inside while the top surface blisters from the hot air above.
Step 3 — Place in basket: Lay the naan wet-side down in the preheated basket. The dough should not touch the heating element at the top — check clearance before closing. Do not stack or overlap naans.
Step 4 — Air fry 4–5 minutes: Cook at 190°C for 4–5 minutes. Do not open the basket in the first 3 minutes — the pressure and heat build-up during this time is what creates the puff and blisters. After 3 minutes, you can check: the naan should be visibly puffed with golden patches on the surface. If pale, continue for 1–2 more minutes.
Step 5 — Garlic butter immediately: Remove from basket. Brush immediately and generously with the fresh garlic butter — melted butter, freshly grated garlic, and chopped coriander. The naan must be steaming hot when you brush it. The heat from the naan gently cooks the raw garlic as it melts into the surface, turning sharp raw garlic into sweet, aromatic garlic without you doing anything extra.
💡 Hina's Air Fryer Garlic Naan Notes:
— For extra char marks like a tandoor: increase to 200°C and cook for the last 60 seconds on the higher heat setting
— If your naan inflates into a full balloon (fully hollow inside): the dough is slightly too thin at that section. This doesn't affect the taste at all — it's actually how street tandoor naans look. Just press gently with a clean cloth when it comes out
— Smaller air fryers (2–3 litre): make smaller naans — 6 inches rather than 8–9. Same recipe, same time, just scaled down in size
— If the base sticks: your basket wasn't oiled enough or wasn't preheated. Both solutions are simple — more oil, longer preheat next time
Method comparison — choose based on your situation
| Method | Time | Result | Best for |
|---|---|---|---|
| Stovetop / Tawa | 3–4 min/naan | Authentic blistered, slightly charred surface — closest to tandoor. Softer interior. | 1 naan at a time, most authentic result Most authentic |
| Oven | 5–6 min batch | Even golden colour, softer surface, less blistering. Good for 4–6 naans at once. | Feeding a group, electric or induction kitchen Best for batches |
| Air Fryer | 4–5 min/naan | Crispiest exterior of all three — blistered, slightly crunchy shell with fluffy interior. Golden to dark spots. | 1–2 naans, crispiest texture preference Crispiest result |
Pro Tips — How to Make Soft and Fluffy Garlic Naan Every Time
- The baking soda + yogurt combination is non-negotiable. These two ingredients react together to create the specific irregular bubbles and chewy crumb that makes naan taste like naan. I tested this recipe with baking powder and the result was softer and more uniform — but it tasted cakey, not bready. The uneven rise from baking soda reacting with acidic yogurt is the texture you want. Don't swap them.
- Sift the flour. Aerated flour absorbs the yogurt and water more evenly, which means a smoother dough with no dry pockets. Takes 30 seconds, makes a noticeable difference.
- Rest for 2 hours minimum. I know 20 minutes is listed as the absolute minimum — and it works in an emergency. But 2 hours is where the flavour develops and the gluten relaxes enough to create that authentic texture. Overnight in the fridge is the best result I've ever had.
- Cast iron only for the inverted method. Nonstick pans can warp when inverted over direct flame and the coating can degrade at very high heat. Cast iron is safe to use this way — it's designed for extreme heat. If you don't have cast iron, use Method B (both sides on the hob) on whatever pan you have.
- Brush butter while still steaming-hot. If the naan has cooled even slightly before buttering, the butter sits on the surface instead of absorbing in. Hot naan + immediate butter = the glossy, fragrant finish you see in the photos.
- If your naan turns out hard: Almost always caused by one of four things: dough rolled too thin, oven/skillet not hot enough before the naan went in, too much flour added during rolling, or left uncovered after cooking. Cover freshly cooked naan with a kitchen towel immediately — the trapped steam keeps it soft.

How This Garlic Naan Tastes (So You Know You've Got It Right)
Fresh off the skillet and just brushed with garlic butter, this naan is one of the most satisfying things to come out of a home kitchen. The surface has a slight resistance — where the dough blistered against the hot iron — and then gives way immediately to an interior that's soft, almost pillowy, with a faint tang from the yogurt.
The garlic hits you twice: once as background warmth from the powder baked into the dough, then again as the fresh garlic butter melts into the surface and fills the kitchen with that unmistakable aroma. The coriander adds freshness and colour. The sesame seeds give a barely-there nuttiness at the edge of each bite.
If it comes out flat and pale, the skillet wasn't hot enough. If it's hard, the dough needed more rest. If it tastes slightly bitter, the baking soda wasn't evenly mixed into the flour. All of these are fixable — and they're exactly the things I got wrong before I got this recipe right.
What to Serve with Garlic Naan — Best Pairings
Garlic naan is the best possible companion for anything saucy, spiced, or slow-cooked. The bread acts as both a utensil and a side — tear it, scoop with it, wrap with it. Here's what works best from my kitchen:
- Indian Curries: Chicken tikka masala, lamb curry, Chicken Karahi, Korma, Palak Chicken and Beef masala.
- Soups & Stews: Cream of Mushroom soup, Chicken corn soup, lentil soup, mulligatawny soup or hearty vegetable stew.
- Grilled or Roasted Dishes: Oven-baked chicken, Lamb chops, or kebabs.
- Snacks & Appetizers: Cut into wedges and serve with cheese dip, hummus, or yogurt raita.
- Creative Pairings: Spread with garlic butter and use as a base for mini pizzas or wraps.
💡 Tip: Serve naan warm for the softest, fluffiest bite. Brushing with extra garlic butter just before serving enhances the flavor and makes it irresistible!
How to Store, Freeze and Reheat Garlic Naan
Storing at Room Temperature:
- Let the naan cool completely, then store in an airtight container or zip-lock bag.
- It will stay soft and fresh for 1–2 days.
Refrigeration:
- Keep naan in an airtight container in the fridge for up to 5 days.
- Reheat on a skillet or in the oven to restore softness.
- Reheat on a dry cast iron skillet for 60 seconds per side with a small knob of butter — this restores the surface texture far better than a microwave, which makes naan rubbery.
Freezing:
- Allow the naan to cool completely.
- Wrap each piece individually in plastic wrap or parchment paper, then place in a freezer-safe bag.
- Freeze for up to 1 month.
- Reheat directly from frozen on a skillet, griddle, or oven until warm and soft.
Tip: Brush with a little butter or garlic butter after reheating to bring back that freshly-cooked flavor and softness.
Frequently Asked Questions
Yes, you can also use wheat flour. The outcome may vary slightly, but it will still be delicious and nutritious.
Yes, you can bake naan in the oven. However, naan cooked in a skillet resembles authentic tandoori naan more closely, as it develops bubbles during the cooking process.
Yes, you can incorporate yeast into the dough, but it's preferable to use yogurt and a small amount of baking powder instead. If you opt for instant yeast, roll the naan thinly, as it will expand significantly while cooking.
Naan can become hard if it is rolled too thin, cooked at excessively high temperatures, or if the dough isn't kneaded or allowed to rise properly. If your naan is hard, cover it immediately after applying butter; the steam will help soften it.
Use yogurt in the dough.
Knead well to make it smooth.
Rest the dough in a warm place.
Cook on medium-high heat and brush with butter or garlic butter immediately.
Yes, you can omit yogurt from the dough or replace it with soy yogurt or buttermilk. Yogurt helps to add structure to the naan. If you decide to skip it, make sure to include baking soda and baking powder to achieve a soft, fluffy texture.
Absolutely! Store-bought pizza or naan dough works well. Skip the yeast proofing step and roll it out before cooking.
Yes — use Method B (both sides on the skillet) rather than the inverted flame technique, which requires a gas burner. Heat a cast iron skillet on your highest setting for 3–4 minutes, cook the naan covered for 2 minutes on the first side, then flip and cook uncovered for 1–2 minutes until golden and charred in spots. Reader Ashley made it this way on an electric hob using a cast iron wok and described the result as "exactly like authentic restaurant naan.
Plain naan has the same base dough but no garlic in the dough and is typically finished with butter alone. Garlic naan adds garlic powder to the dough for background flavour, then gets a second layer of fresh garlic cooked into the butter that's brushed on immediately after cooking. That double garlic — baked-in and fresh on top — is what gives restaurant garlic naan its distinctive flavour.
Yes — this is actually the best result. Make the dough the night before, cover it tightly, and refrigerate overnight. The slow cold rest develops a noticeably deeper, more complex flavor. Take it out of the fridge 30 minutes before shaping to let it come to room temperature. Cook exactly the same way.
More Naan Recipes
Keema Naan | Tandoori Naan | Roghni Naan | Aloo Naan | Aloo Kulcha
🥣 How do you make your Garlic naan at home?
⭐ Rate this recipe below
💬 Drop your questions in the comments
📲 Follow along on Instagram for more recipes.
Easy Garlic Naan Recipe (No Yeast) — Stovetop, Oven & Air Fryer
Equipment
- Iron Skillet
Ingredients
Naan Dough (No Yeast)
- 3 cups all-purpose flour (maida) Use standard unbleached all-purpose flour. Avoid bread flour — its higher protein content makes naan tough and chewy rather than soft and pliable.
- ⅓ teaspoon baking soda The leavening agent — reacts with the yogurt's acidity to create irregular carbon dioxide bubbles, giving naan its authentic uneven puff. Do not substitute with baking powder.
- ⅓ teaspoon garlic Powder Goes into the dough for background garlic warmth throughout every bite. This is Layer 1 of the double garlic system — subtle, baked-in, present in every mouthful.
- 1 tablespoon plain full-fat yogurt Does three jobs: activates the baking soda, adds mild tang, and tenderises the gluten strands. Full-fat only — low-fat yogurt has less acidity and the baking soda reaction is weaker. Don't substitute with Greek yogurt unless thinned with 1 tablespoon water.
- 1 tablespoon oil (vegetable or neutral) Coats the gluten strands and keeps the naan soft and pliable. Do not reduce — this is what prevents the naan from cracking or going hard after cooking.
- ½ teaspoon salt Always add to the flour first — never drop directly onto the yogurt or oil before mixing, as high salt concentration inhibits the baking soda reaction.
- ⅓ cup warm water, added gradually Add while kneading — 1 tablespoon at a time — until the dough is soft and slightly tacky. The exact amount varies by flour brand and kitchen humidity. You may need anywhere from 80ml to 120ml.
Garlic Butter Topping (make while first naan cooks)
- 2 tablespoons unsalted butter, melted The carrier for the garlic and herb topping. Brush on immediately while the naan is steaming hot — the heat from the naan gently cooks the raw garlic and melts the butter into the surface simultaneously.
- ½ teaspoon fresh garlic, finely grated Layer 2 of the double garlic system — fresh grated garlic in the butter gives the sharp, pungent top note that makes garlic naan smell and taste like it came from a restaurant. Always freshly grated — jarred garlic doesn't have the same aroma.
- 1 tablespoon fresh coriander (cilantro), finely chopped Mixed into the butter and brushed on at the end. Adds freshness, colour, and herbal contrast to the richness of the butter. Always add to the butter — never sprinkle dry on the cooked naan, it dries out immediately.
- ½ teaspoon sesame (Black & White) this quantity of sesame required or every naan.
For Cooking
- as needed water (for wetting naan underside) A few drops brushed or patted onto one side of the shaped naan before cooking. The wet side goes down against the hot surface — the moisture creates an initial steam burst that puffs the dough from the inside while the top blisters. Used for all three methods.
- light spray oil (for air fryer basket / oven tray only) Stovetop method: no oil needed on the pan. Oven method: brush on tray before placing naan. Air fryer method: light spray on basket before preheating. Prevents sticking in all three non-stovetop methods.
Instructions
Make the dough
- Mix the dry ingredients:In a large mixing bowl, combine all-purpose flour, baking soda, garlic powder, and salt. Whisk briefly to distribute the baking soda and garlic powder evenly through the flour. Uneven baking soda creates bitter spots in the finished naan — this 30-second step prevents that.
- Add yogurt and oil:Add the yogurt and oil to the flour mixture. Using your hands, crumble and work everything together until it resembles rough breadcrumbs — this pre-mixing ensures the fat and acid are distributed before you add water, which makes the final kneading faster and more even.
- Add water and knead:Add warm water gradually — 1 tablespoon at a time — while kneading. Continue until a soft, slightly tacky dough forms. Knead for 5–6 minutes until completely smooth and elastic. The dough should spring back slowly when you press it with a finger. If sticky, add flour one teaspoon at a time. If stiff, add warm water one teaspoon at a time.
- Rest for 2 hours:Lightly coat the dough ball with oil, place in the bowl, and cover tightly with plastic wrap or a damp kitchen towel. Rest in a warm, draught-free spot for 2 hours minimum. A switched-off microwave or oven with just the light on is ideal.
- Make the garlic butter:While the first naan is cooking, melt butter in a small bowl. Add freshly grated garlic and finely chopped coriander. Stir together. The butter's residual heat begins softening the raw garlic — by the time you brush it on the hot naan, it will be aromatic rather than harsh. Keep warm.
Shape the naans
- Divide and rest:After resting, turn dough onto a lightly floured surface and knead gently for 2 minutes. Divide into 6 equal portions and roll each into a smooth ball. Cover the balls you're not using immediately with a damp cloth — they dry out and skin over within minutes of being exposed to air.
- Shape each naan:Using your hands (preferred) or a rolling pin, flatten each ball into an oval or teardrop shape — approximately 8–9 inches long and ¼ inch thick. Hand-stretching by rotating the dough gives an irregular, authentic surface. Press the dimple pattern firmly across the surface using all fingertips — watch the video for the exact technique.
- Wet the underside:Pat or brush a few drops of water onto one side of the shaped naan — this becomes the side that goes against the hot surface. The moisture creates an initial burst of steam that puffs the dough from the inside while the top blisters and chars from the heat above. Use for all three cooking methods.
Cook (choose your method)
Stovetop / Tawa — most authentic result
- Heat the skillet for 3–4 minutes:Place your cast iron skillet or heavy tawa over high heat for 3–4 minutes until very hot. Test by holding your hand 5cm above — you should feel strong radiant heat immediately. A lukewarm pan gives pale, flat naan. No oil on the pan.
- Cook first side — 60–90 seconds:Place naan wet-side down onto the hot dry skillet. Press lightly with the back of a spoon for the first 10 seconds to ensure full contact. Cook for 60–90 seconds — you'll see bubbles forming across the surface and the edges changing from translucent to opaque. The underside will have golden-brown spots.
- Cook second side — flip method (non-stick / induction):Flip the naan and cook the second side uncovered for 1–2 minutes until golden spots appear. For extra puff, cover with a lid for the last 30 seconds.
- Cook second side — inverted skillet over flame (cast iron / gas only):Using thick oven gloves, grip the cast iron skillet handles and flip it upside down over the gas flame, holding the naan against the pan with tongs. Rotate slowly over the flame for 30–60 seconds until the surface blisters and chars in spots. Return upright and remove naan immediately with tongs.
- Garlic butter finishBrush immediately and generously with garlic butter the moment the naan comes off the skillet. The heat from the naan melts the butter in and gently cooks the fresh garlic — the whole naan becomes glossy, fragrant, and soft. Cover with a clean kitchen towel while you cook the remaining naans.
Oven method — best for batches
- Preheat oven to maximum temperature:Set your oven to its highest temperature — usually 475–500°F (245–260°C). Place a heavy baking tray or pizza stone inside to preheat for at least 15 minutes. The tray must be screaming hot before the naan goes on — this mimics the immediate intense heat of a tawa and is what creates the puff.
- Bake 5–6 minutesCarefully slide the shaped naan (wet-side down) directly onto the hot tray or stone. Bake for 5–6 minutes until puffed and golden with some darker spots. For char blisters, switch to broil/grill for the final 60–90 seconds — watch constantly.
- Garlic butter finishBrush with garlic butter immediately on removal from the oven. Cover with a kitchen towel and continue with remaining naans. The oven method gives a slightly drier surface than the skillet — be slightly more generous with the butter to compensate.
Air Fryer — crispiest result
- Preheat air fryer to 190°C (375°F):Preheat for 2–3 minutes. Lightly spray or brush the basket with oil. Skipping the preheat means the naan sticks to a cold basket and the base doesn't get the immediate heat burst needed to create the blistered surface and internal puff.
- Check basket clearance:Place the shaped naan in the basket wet-side down before switching on the air fryer. Check that there is at least 3–4cm of clearance between the top surface of the naan and the heating element above. Garlic naan without yeast puffs significantly — more than you expect. In smaller 2–3 litre air fryers, make naans 6 inches rather than 8–9 inches to ensure clearance.
- Air fry 4–5 minutes at 190°C:Cook at 190°C (375°F) for 4–5 minutes. Do not open the basket in the first 3 minutes — the pressure and heat build-up during this period is what creates the internal puff and surface blisters. After 3 minutes, check: the naan should be visibly puffed with golden patches. If still pale, continue for 1 more minute. The finished naan should be golden to dark golden on the surface with some darker blistered spots.
- Garlic butter finish immediately:Remove from basket and brush immediately with garlic butter while piping hot. The air fryer naan surface is noticeably crispier than the other methods — if you prefer it slightly softer, wrap in a clean kitchen towel for 90 seconds after buttering. The trapped steam softens the exterior slightly while keeping the interior fluffy.

Hinz
It's easy to make restaurant style Garlic Naan bread at home. Handful ingredients and iron skillet will help to make delicious naan to serve on dinner or lunch.
Ashley
This recipe is a keeper! I used milk kefir instead of yoghurt, and it worked out great. I also didn't have a cast iron skillet or an open flame oven so I just used my cast iron wok instead on a really hot element stovetop and that still worked great, just flip the naan over halfway and toast it for 30 seconds. Tastes exactly like at an authentic restaurant 10/10
Hinz
Thanks, Ashley for sharing your experience! Stay connected for more recipes...