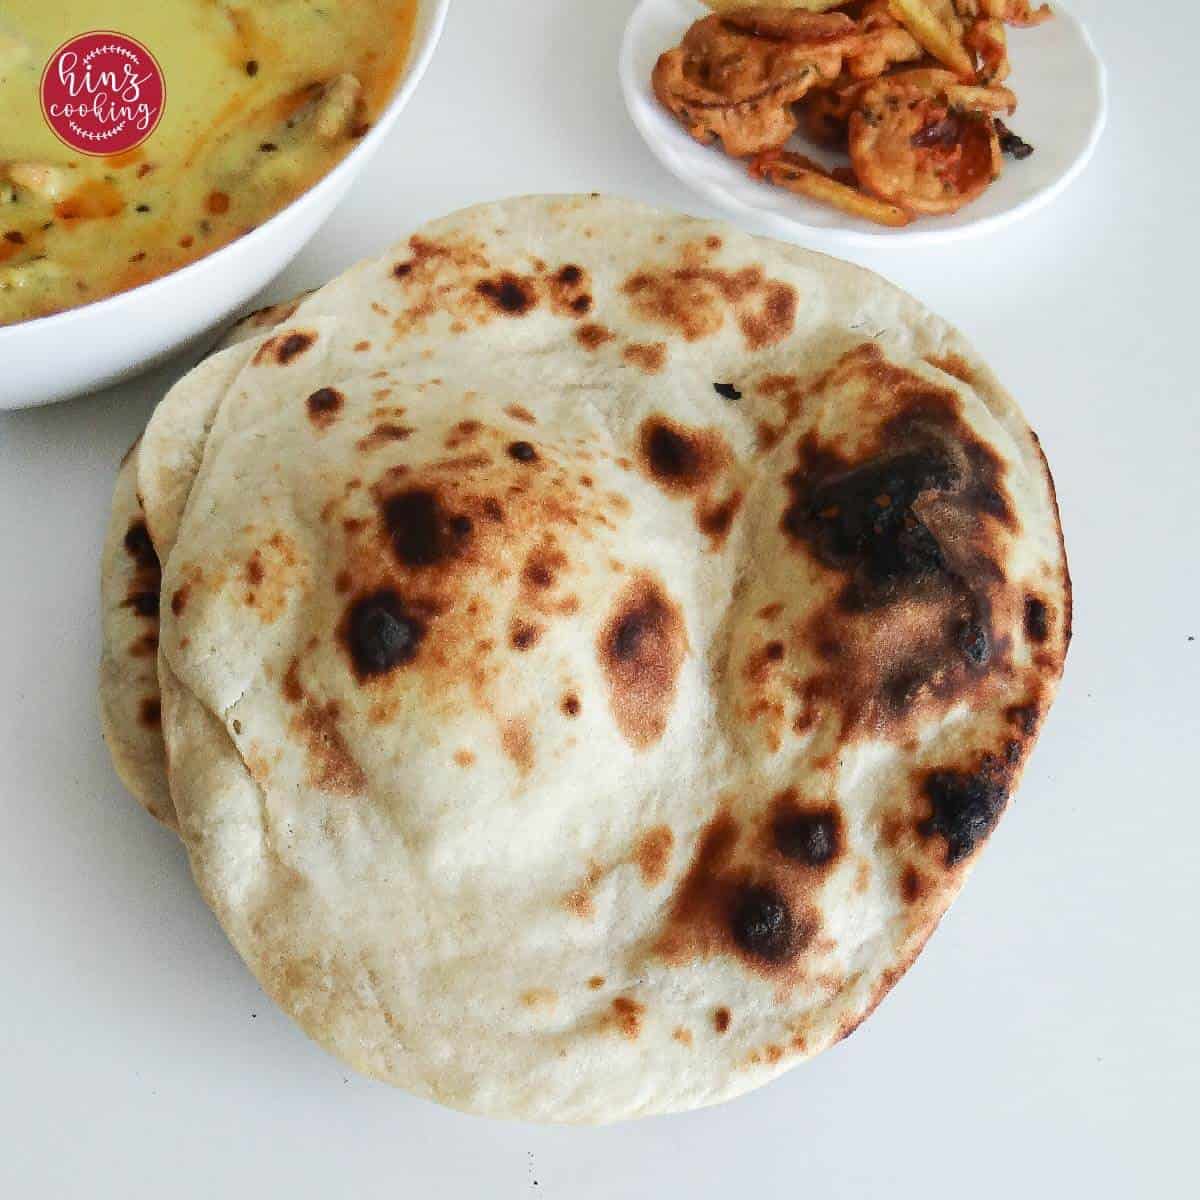
This is the naan I make most in my Dubai kitchen — not the sesame-topped roghni naan for guests, not the garlic naan for weekend dinners, but this one. Simple, plain, no yeast, made on a cast iron skillet in under 30 minutes of active cooking time. The naan you make on a Tuesday night when the dal is almost ready and you need bread on the table quickly.
Tawa naan without yeast is the everyday naan of Pakistani and Indian home cooking. Six ingredients you already have, a skillet that's already in your kitchen, and a technique that takes two attempts to learn and then feels completely natural forever after. The inverted skillet over a gas flame is what creates those dark blistered spots on the surface — and I'll show you exactly how to do it safely.
If you're new to making naan, start here. This is the base recipe. Once you know this dough, my garlic naan, aloo naan, keema naan, and roghni naan all use the same foundation — you'll already understand the dough behaviour and the cooking technique.
Jump to:
- What is Tawa Naan? (And How Is It Different From Tandoori Naan?)
- Why You'll Love This Recipe
- Ingredients
- How to Make Tawa Naan Without Yeast — Step by Step
- How Tawa Naan Should Look, Feel and Taste
- How to Make Soft Tawa Naan Every Time — 7 Tested Tips
- Naan vs Roti — The Question Everyone Asks
- What To Serve With Tawa Naan
- What to Make Next — Your Naan Journey
- Frequently Asked Questions
- You Might Like This
- Easy Tawa Naan — Soft Plain Naan Without Yeast
What is Tawa Naan? (And How Is It Different From Tandoori Naan?)
A tawa is a flat iron griddle used across South Asian kitchens — the same pan used for roti and paratha. Tawa naan is simply naan cooked on this flat iron griddle rather than in a clay tandoor oven.
Traditional tandoori naan is slapped directly onto the inner walls of a clay oven (tandoor) that reaches temperatures of 480–900°F. The extreme heat creates the characteristic bubbles, slight char, and smoky aroma. At home, we replicate this by using a cast iron skillet at maximum heat, then flipping the entire pan over the gas flame so the direct fire hits the naan surface — creating the same blistered effect.
The result is remarkably close to restaurant tandoori naan. Not identical — nothing beats a clay oven at 700°F — but far closer than oven-baked naan and indistinguishable once it's buttered and on the table.
Tawa naan vs roti vs chapati — what's the difference?
| Tawa Naan | Roti | Chapati | |
|---|---|---|---|
| Flour | All-purpose (maida) | Whole wheat (atta) | Whole wheat (atta) |
| Leavened? | Yes (baking powder) | No | No |
| Thickness | Thick — 5–8mm | Thin — 2–3mm | Very thin — 1–2mm |
| Texture | Soft, pillowy, slightly chewy | Thin, slightly dry | Very thin, flaky |
| Occasion | Dinner, special meals | Everyday | Everyday |
| Best with | Rich curries, kebabs | Dal, sabzi | Dal, sabzi, everyday |
Naan is richer and softer than roti because of the all-purpose flour, yogurt, and oil — it's a more indulgent bread. Roti is the everyday healthy choice. Naan is for when the curry deserves a worthy partner.
Why You'll Love This Recipe
- No yeast — ready faster. Baking powder does the leavening work. No 2-hour proof. Rest the dough for 1 hour and you're cooking. Perfect for weeknight dinners when you decide on naan at the last minute.
- 6 ingredients you already have. Flour, salt, sugar, baking powder, oil, yogurt. Water. That's it. No specialist ingredients, no trips to a shop.
- The tawa technique is simpler than it looks. The inverted skillet over a gas flame sounds alarming the first time. After two naans you'll wonder why you were nervous. Full safety instructions below.
- Works on any hob. Gas gives you the inverted flame method. Electric or induction: cook both sides on the skillet — different technique, same delicious result. Both methods covered.
- The base for all my stuffed naans. Learn this dough and you can make garlic naan, aloo naan, and keema naan from the same foundation.
Ingredients
All-Purpose Flour (Maida) — 2.5 cups (312g) The base of the dough. All-purpose flour gives naan its soft, chewy, slightly airy texture. You can substitute up to half with whole wheat flour (atta) for a wholemeal version — the naan will be slightly denser and more nutritious, with a brownish colour. All wholemeal will make it more like a thick roti.
Salt — ½ tsp Flavour and structure. Add to the flour before mixing — never directly onto the yogurt or baking powder before combining.
Sugar — 1 tsp Sugar in naan dough isn't for sweetness — it accelerates the fermentation process during the rest period. It also helps the surface brown more evenly on the tawa. Don't skip.
Baking Powder — ½ tsp The leavening agent in place of yeast. Creates air pockets in the dough that expand during cooking, giving the naan its characteristic puff and slight chew. More than ½ teaspoon and the naan tastes slightly chemical — don't increase.
Oil — 1 tbsp Keeps the dough soft and prevents drying during the rest period. Also adds a faint richness. Neutral vegetable oil only.
Yogurt — 1.5 tablespoon (full-fat) Does two jobs: tenderises the gluten strands (making the naan soft rather than chewy) and adds a subtle tang to the dough. Full-fat plain yogurt gives the best result.
Warm Water — ¾ cup (180ml), added gradually The standard ratio for this dough is 2:1 flour to total liquid — 2.5 cups flour needs approximately ¾ cup water (since the yogurt counts as part of the liquid). Add water gradually while kneading — a tablespoon at a time — because the exact amount varies by flour brand and kitchen humidity. The dough should feel soft, smooth, and slightly tacky. As reader Trish pointed out in the comments — and she was absolutely right — the water quantity matters. This is the ratio I use every time.
For finishing: Butter or ghee — 1 tablespoon, melted. Brushed immediately when the naan comes off the tawa. This is not optional.
How to Make Tawa Naan Without Yeast — Step by Step
Make the Dough
Step 1 — Combine dry ingredients In a large mixing bowl, add all-purpose flour, salt, sugar, and baking powder. Whisk briefly to distribute the baking powder evenly through the flour. Uneven baking powder creates bitter spots — this 30-second step prevents that.
Step 2 — Add wet ingredients Add oil and yogurt to the flour. Use your hands to crumble everything together until the mixture resembles rough breadcrumbs. This pre-mixing step distributes the fat before you add water, which makes the dough come together faster and more evenly.
Step 3 — Add water and knead Add warm water gradually — start with ½ cup, add more tablespoon by tablespoon as you knead. Work the dough for 10–15 minutes until smooth, soft, and slightly tacky. It should spring back when you press it. The finished dough should feel noticeably softer than you expect — almost a little sticky. That softness is what makes the naan pillowy.
💡 Hina's Note: The most common mistake I see is adding too much flour to fix a sticky dough. Resist it. Soft, slightly sticky dough = soft naan. A tight dough = hard naan with no fix.
Step 4 — Rest for 1–2 hours Brush the dough lightly with oil, cover the bowl tightly with plastic wrap or a damp cloth, and rest in a warm draught-free spot for a minimum of 1 hour. 2 hours gives a noticeably better result — the baking powder reaction continues gently and the gluten relaxes completely. I keep mine in a switched-off microwave.
After resting, the dough should look slightly puffed. Uncover and knead for 2–3 minutes until smooth and elastic again.
Shape the Naans
Step 5 — Divide and roll Divide the rested dough into 6 equal portions. Roll each into a smooth ball. Take one ball and roll on a lightly floured surface into a rough oval or teardrop shape — approximately 8–9 inches long and about ¼ inch thick. Naan doesn't need to be perfectly shaped — irregular edges are traditional.
Step 6 — Wet one side Pat or brush a thin layer of water onto one side of the shaped naan. This becomes the side that goes against the hot tawa. The moisture creates an initial burst of steam that puffs the dough from the inside while the top surface blisters and chars from the heat above.
Cook the Naan
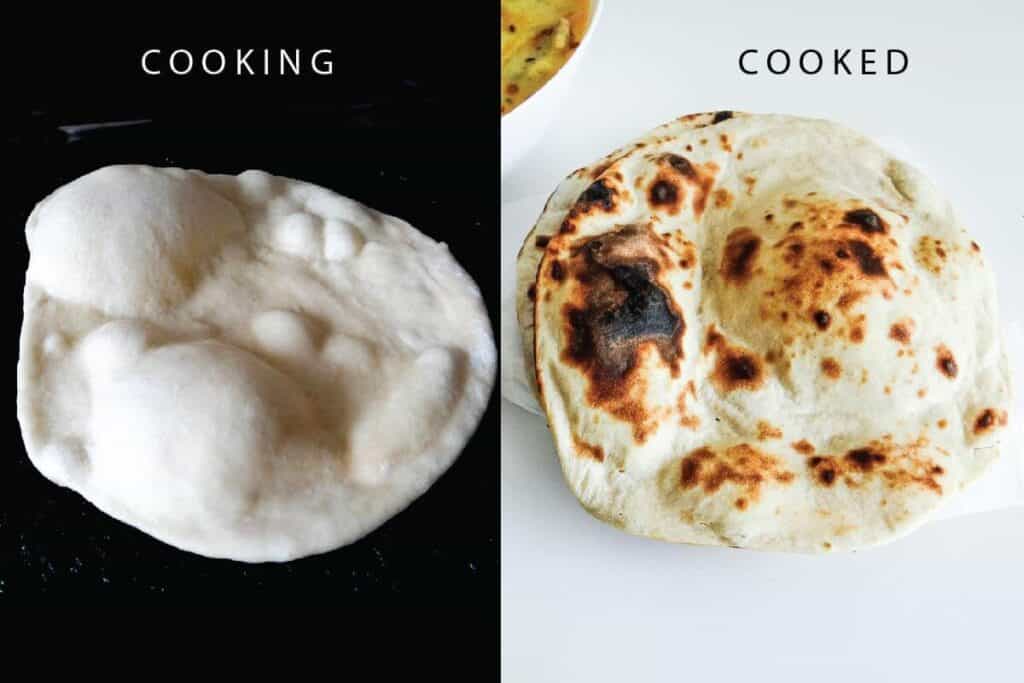
Step 7 — Preheat the tawa Place your cast iron skillet or heavy iron tawa over medium-high heat for 3–4 minutes until very hot. A cold or lukewarm pan gives you pale, flat naan. Test by flicking a drop of water — it should evaporate on contact immediately.
Step 8a — Gas hob: cook first side Place naan wet-side down onto the hot dry tawa. Press lightly with the back of a spoon for the first 10 seconds to ensure full contact. Cook on medium heat for 60–90 seconds until bubbles begin to form across the surface and the underside shows golden-brown spots.
Step 8b — Gas hob: inverted flame method (for the blistered surface)
💡 Hina's Note on the flip: I've flipped hundreds of tawas over a gas flame in my Dubai kitchen. The thing most people get wrong is hesitating halfway through. Once you commit to the flip, don't stop — the naan is held to the tawa by the moisture layer and will not fall unless you shake the pan violently. Move confidently and keep moving the tawa in a slow circle over the flame so the heat reaches every part of the surface evenly.
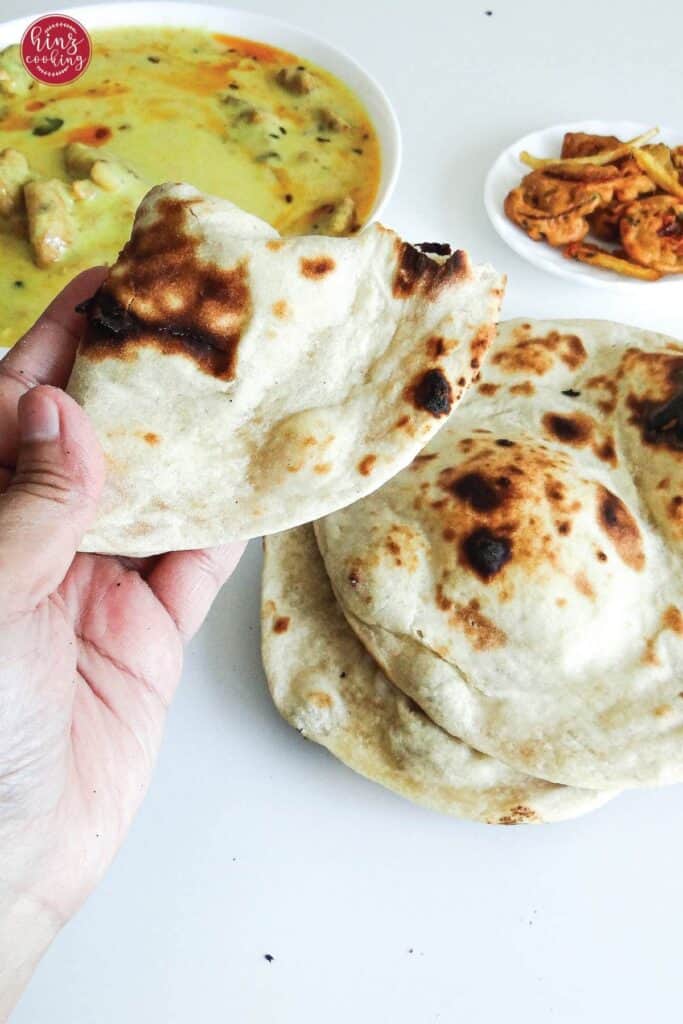
Using thick oven gloves, grip the tawa handles firmly. Flip the entire tawa upside down over the gas flame. Hold it 5–8cm above the flame. Move the tawa in a slow circular motion for 30–60 seconds until the surface of the naan blisters and develops dark char spots in places. The aroma will be smoky and slightly toasty — that's exactly right.
Return the tawa to its normal position and remove the naan with tongs.
Step 8c — Electric or induction hob (no flame available) Cook the first side exactly as above for 1–2 minutes until golden spots appear underneath. Flip directly on the tawa and cook the second side uncovered for 1–2 minutes until golden spots appear. Cover with a lid for the final 30 seconds for extra puff. The result is excellent — slightly less char than the flame method but equally soft and flavourful.
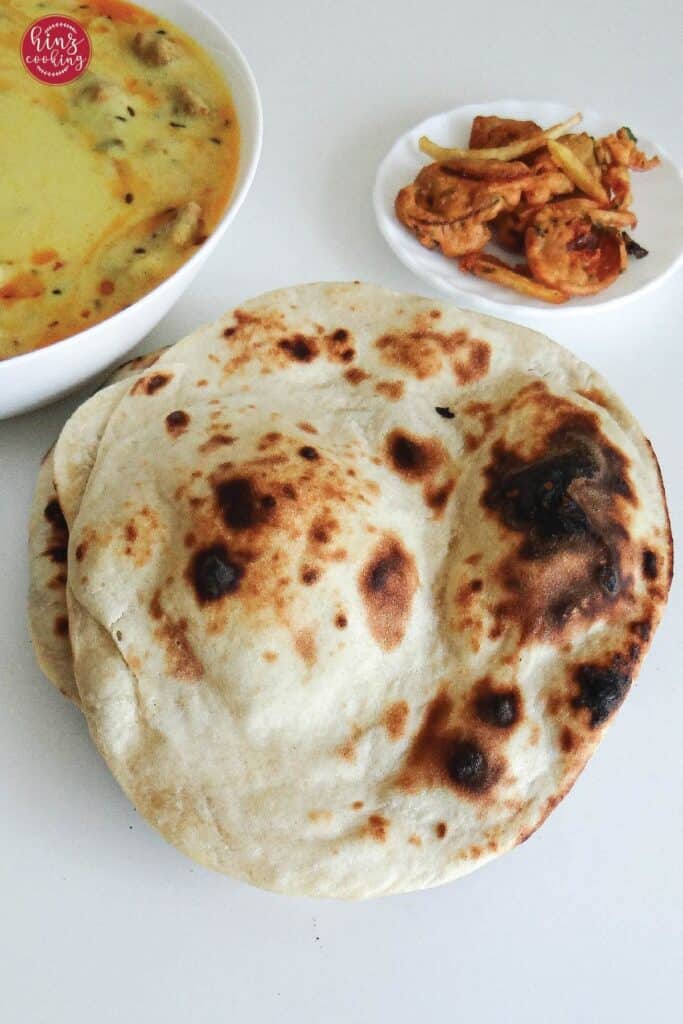
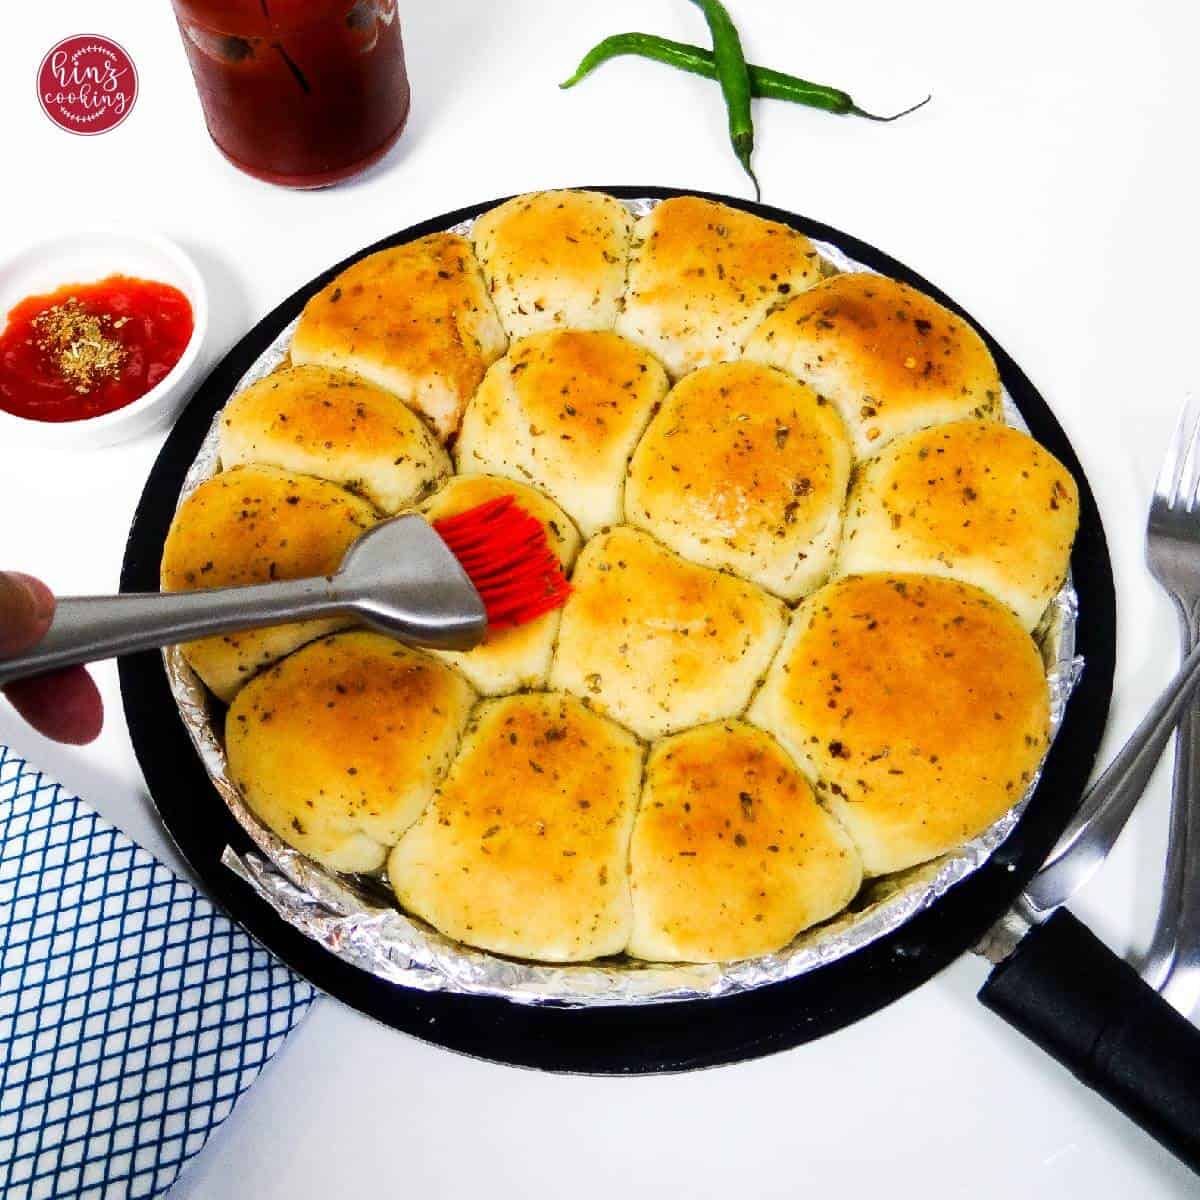
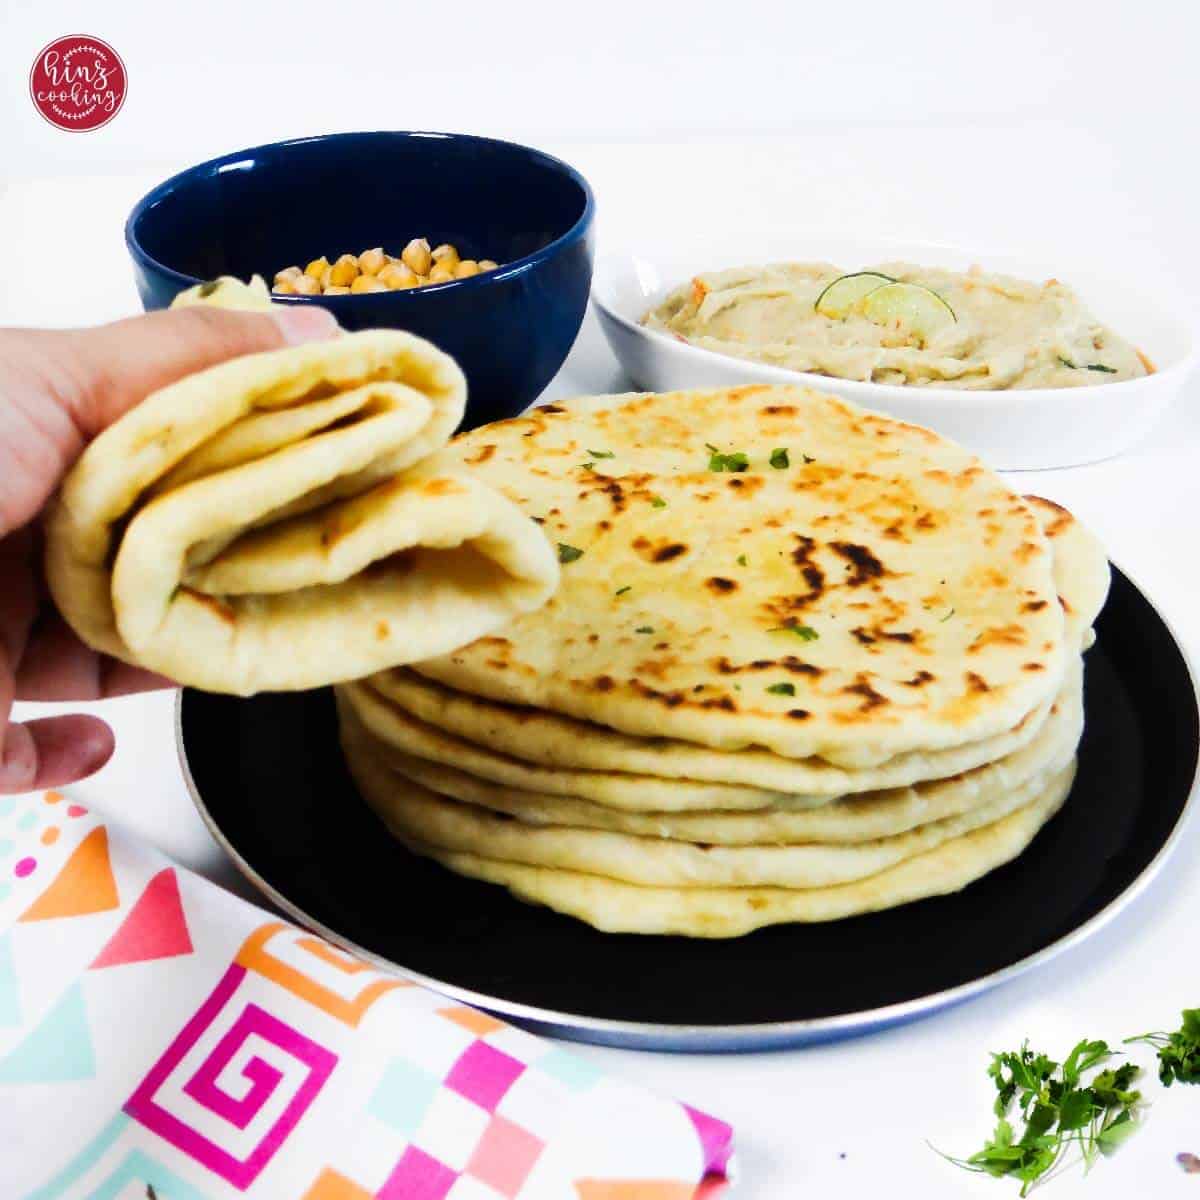
Step 9 — Butter finish The moment the naan comes off the tawa, brush it immediately and generously with melted butter or ghee. The heat of the naan melts the butter into the surface — it becomes glossy, fragrant, and soft in seconds. Stack finished naans on a plate and cover with a clean kitchen towel while you cook the rest.
How Tawa Naan Should Look, Feel and Taste
- A properly made tawa naan has dark char spots across the surface — not burnt, but blistered where the direct flame hit. The underside is more evenly golden from the tawa contact. When you lift it, it feels light with some flexibility — not stiff, not limp.
- Press the centre with one finger: it should spring back immediately. If it doesn't, it's either undercooked or the dough was too dense. The edges are slightly thinner and crispier than the centre — that's traditional, not a mistake.
- Bite into it fresh off the tawa and the inside is completely soft — almost cloud-like. The slight tang from the yogurt is a background note. The butter finish makes the whole surface fragrant and glossy. It tastes clean and slightly smoky — the perfect vehicle for a richly spiced curry.
- If yours came out hard: dough was too tight (not enough water) or it was overbaked. If pale and flat: tawa wasn't hot enough or dough didn't rest long enough. Both are easy fixes on the next attempt.
How to Make Soft Tawa Naan Every Time — 7 Tested Tips
1. Soft dough always. The dough should feel softer than you expect — slightly sticky, not firm. This is the single most important factor. Tight dough = hard naan.
2. Don't rush the rest. One hour is the minimum. Two hours is better. The baking powder reaction continues slowly during the rest and the gluten relaxes — making the dough easier to roll and the finished naan more tender.
3. Use cast iron. A heavy iron tawa or cast iron skillet retains heat evenly at high temperatures. Non-stick pans lose heat when you put cold dough on them and the naan steams instead of searing.
4. Preheat properly — 3–4 minutes minimum. The tawa must be hot before the naan goes on. A warm pan gives pale, flat naan. A hot pan gives golden, blistered naan.
5. The direct flame is what creates the char. The blistered, dark-spotted surface of tawa naan comes entirely from the inverted skillet over the gas flame. Without this step, you get a pale, even surface. With it, you get restaurant-style results.
6. Butter immediately. Not after it cools. Not after plating. The moment the naan comes off the tawa — brush it. The residual heat melts the butter into the surface. Cold naan + butter = butter sitting on top, not absorbing in.
7. Wheat flour substitution. Replace up to half the all-purpose flour with whole wheat (atta) for a healthier version. The naan will be slightly denser with a brownish colour. Full wheat substitution works too — the result is closer to a thick, soft roti but still delicious.
Naan vs Roti — The Question Everyone Asks
Western readers who've visited Indian or Pakistani restaurants often ask: "What's the difference between the naan and the roti on the menu?" Here's the honest answer.
Naan is made with all-purpose flour, leavened (here with baking powder, traditionally with yeast), enriched with yogurt and oil, and cooked at high heat on a tawa or in a tandoor. It's richer, softer, thicker, and more indulgent. It's the bread you order when the main dish deserves it.
Roti (also called chapati in many regions) is made with whole wheat flour, unleavened, with just water and a touch of oil, and cooked on a tawa. Thinner, lighter, more nutritious, and the everyday staple in most Pakistani and Indian households. Roti is what most families eat every single day.
The short version: naan is the special occasion bread, roti is the daily bread. But with this tawa method, naan is quick enough to become your everyday bread too.
What To Serve With Tawa Naan
Tawa naan is the most versatile bread in Pakistani cooking because it has no added flavour of its own — it takes on the character of whatever you serve it with. Rich, spiced curries taste even better when you tear fresh naan and scoop them up. These are the pairings I make most in my kitchen:
- Lamb Saag and naan make a perfect combo.
- Chicken Karahi — the most natural pairing for plain tawa naan. The tangy tomato base of karahi is made to be scooped with naan.
- Aloo gosht, Korma, Nihari, Keema Masala seems incomplete without naan.
- Kacha keema kabab, bihari kabab, gola kabab and shami kabab makes a perfect taste.
- Try this naan with Chana Makhani, Toor Dal, Aloo ki Bhujia
What to Make Next — Your Naan Journey
Mastered plain tawa naan? Here's how to progress through the collection:
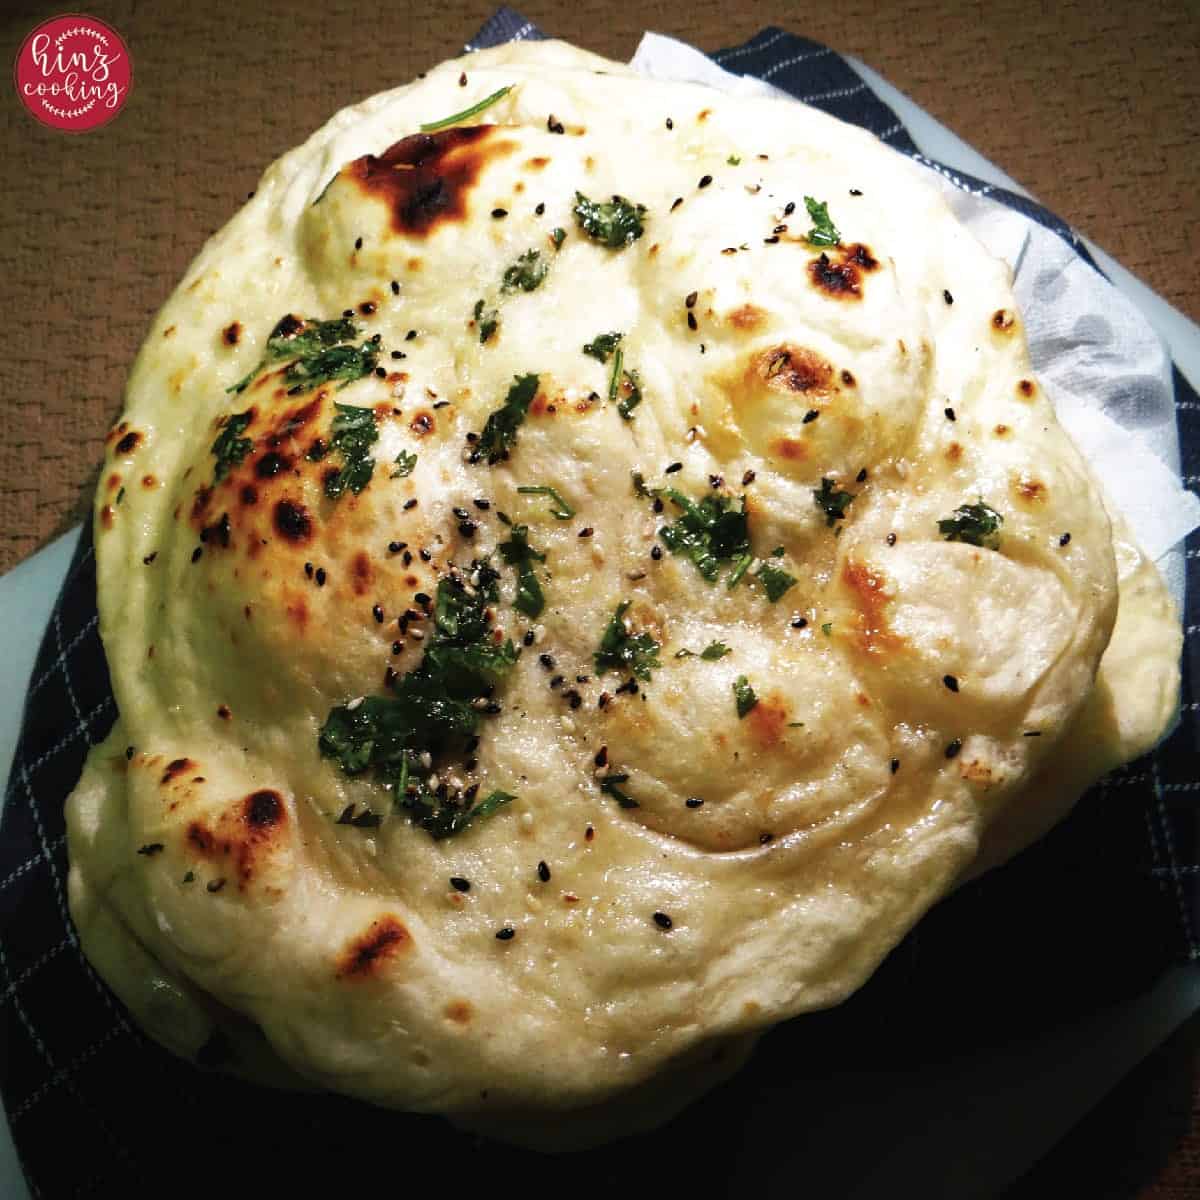
Add garlic butter on top → Garlic Naan — same dough, garlic-butter finish, three cooking methods
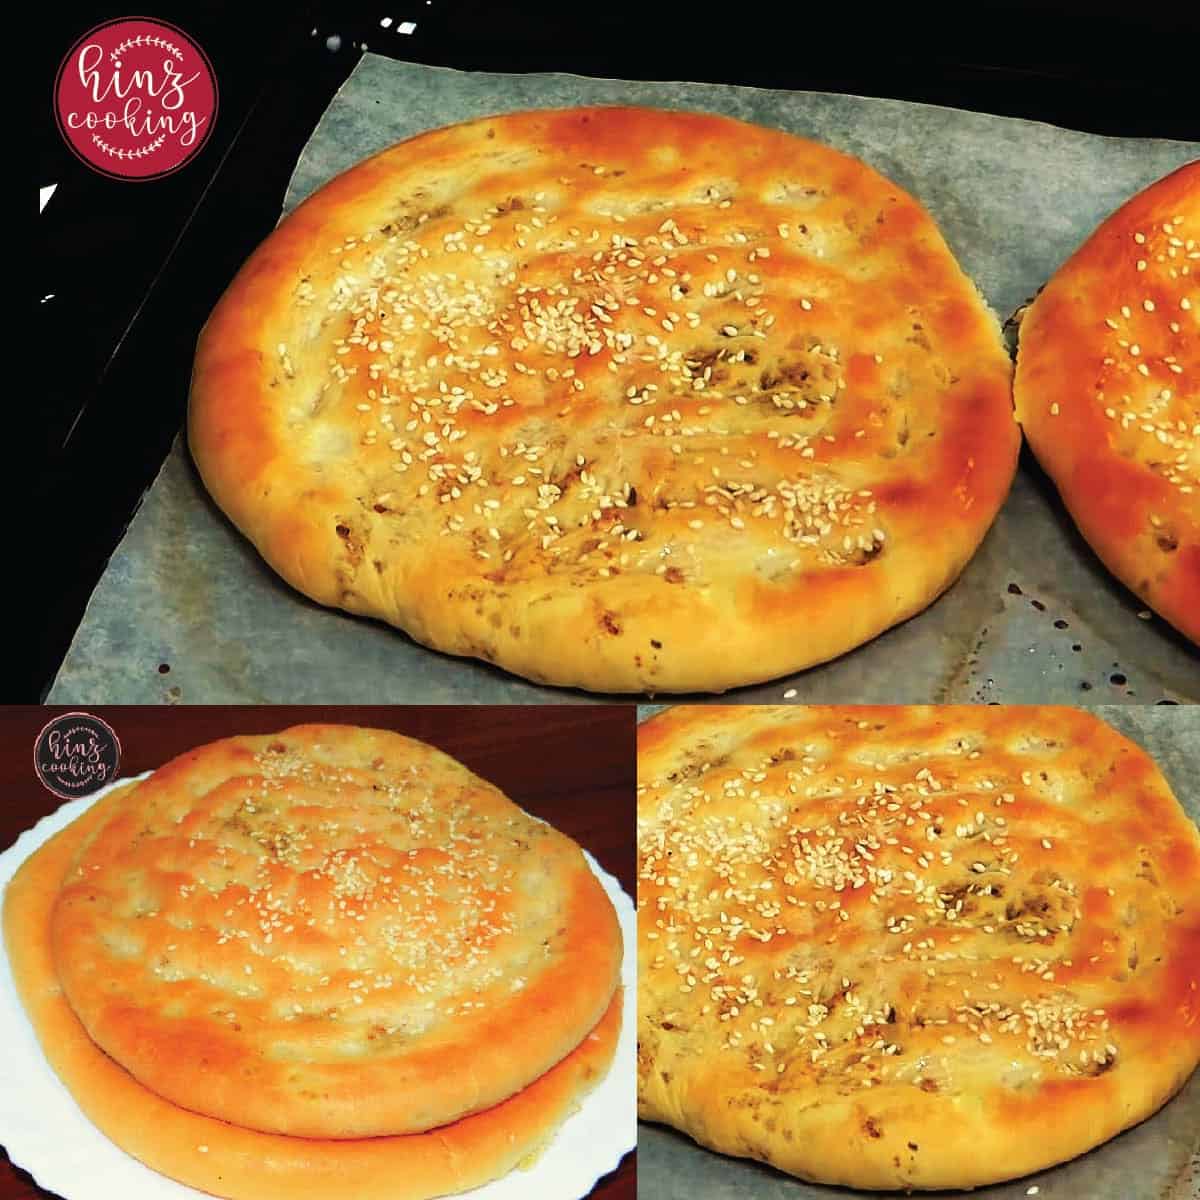
Add sesame seeds and ghee → Roghni Naan — Pakistan's buttery celebration naan, oven baked
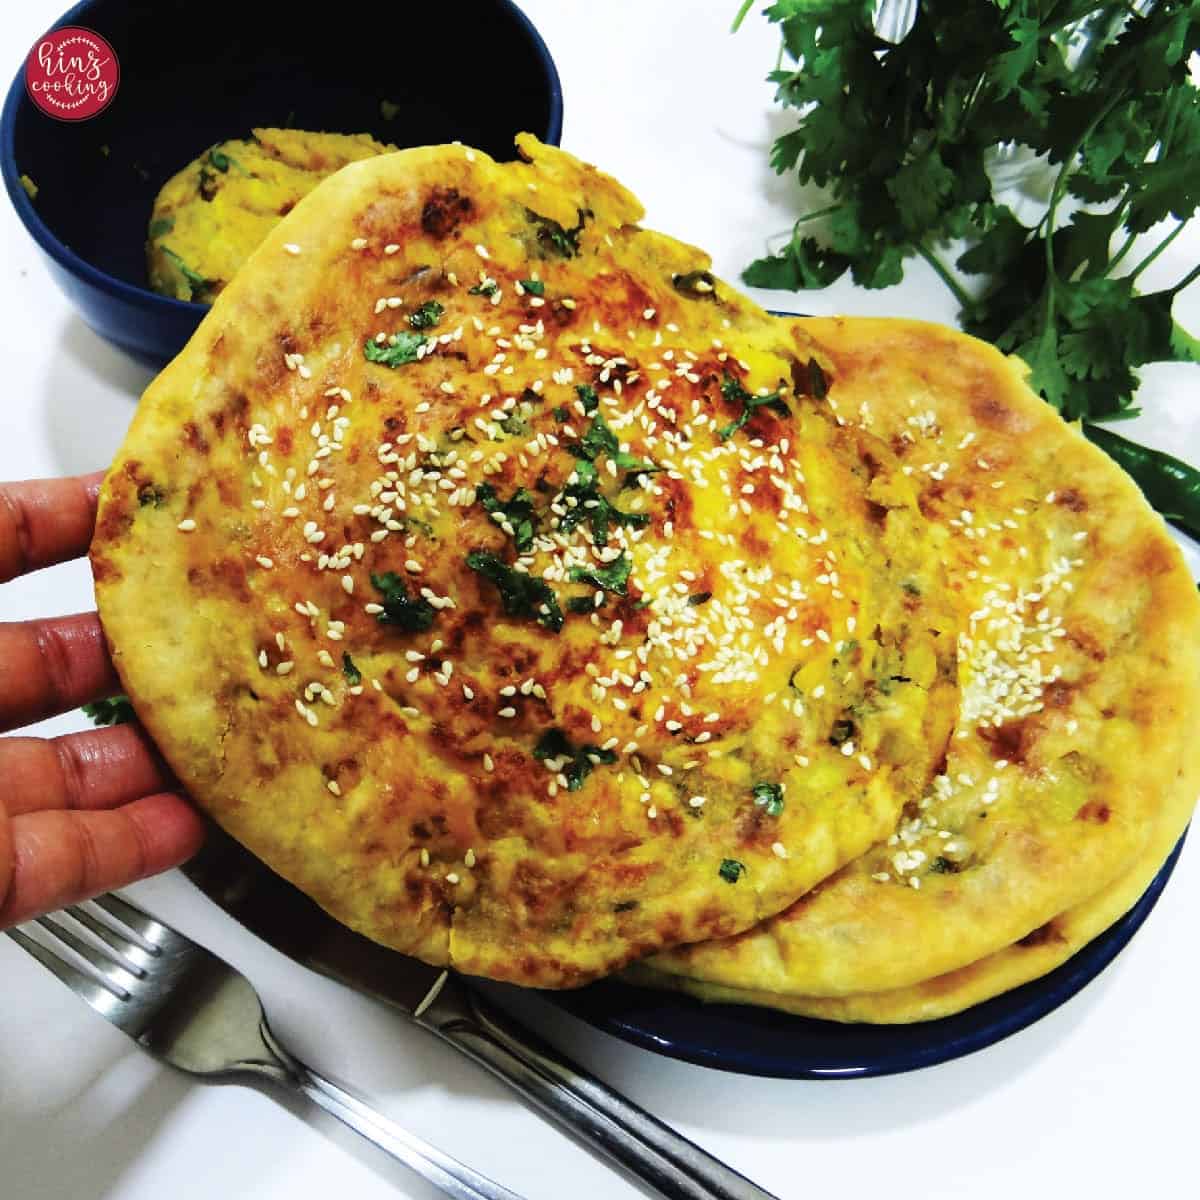
Add potato filling → Aloo Naan — spiced potato stuffed naan, oven, tawa, or air fryer
Add meat filling → Keema Naan — Lahori street food, minced meat stuffed, three cooking methods
Add kulcha-style dough → Aloo Kulcha — Punjabi stuffed bread with a slightly different dough
Frequently Asked Questions
Tandoori naan is traditionally cooked on the inside walls of a clay tandoor oven at extreme heat — 480–900°F. It has a distinctive smoky aroma and slightly charred surface from direct clay contact. Tawa naan is cooked on an iron griddle (tawa) on the stovetop. By inverting the cast iron tawa over a direct gas flame, you can replicate the blistered surface of tandoori naan very closely. The flavour is nearly identical once buttered — the difference is mainly the smoky clay aroma of a real tandoor, which home cooking cannot fully replicate.
Yes — but you'll need to use a different technique since you can't invert the pan over an electric coil or induction ring. Cook the first side for 1–2 minutes until golden spots appear underneath and bubbles form on the surface. Flip and cook the second side for 1–2 minutes uncovered, then cover with a lid for the final 30 seconds to trap steam and help the naan puff. The result is excellent — slightly less charred than the gas flame method but equally soft and flavourful.
Yes, you can bake it in the oven at 220C or 428F. Make it a little thick crust to bake fluffy, soft, and moist naan.
The standard ratio is 2:1 flour to total liquid. For 2.5 cups of flour, start with ½ cup of warm water and add more gradually while kneading. Since the recipe also includes 1.5 tablespoons of yogurt (which counts as liquid), the total liquid is approximately ¾ cup (180ml). Add water one tablespoon at a time until the dough is soft, smooth, and slightly tacky — the exact amount varies by flour brand and kitchen humidity. Reader Trish asked exactly this question — the answer is always: add gradually and trust the feel of the dough.
Yes — but the result will be denser. Baking powder creates the air pockets that make tawa naan soft and slightly pillowy. Without it, you'll get a thicker, chewier flatbread — closer to a thick roti. If you don't have baking powder, add ¼ teaspoon of baking soda instead (it needs the yogurt's acidity to activate). The result with baking soda is slightly more irregular puffing — which is actually closer to the authentic look of street naan.
Yes. Replace up to half the all-purpose flour with whole wheat flour (atta) for a healthier naan — slightly denser with a brownish colour and earthier flavour. A full whole wheat substitution works too and gives you a very thick, soft flatbread that's somewhere between naan and roti. Most Pakistani home cooks use a half-and-half mix on weekdays for a balance of nutrition and softness.
💬 One Quick Question Before You Go
I've been testing tawa naan in the air fryer lately and the results are genuinely exciting — crispy blistered surface, fluffy interior, no gas flame needed.
Would you like me to add an air fryer version of this tawa naan to the recipe?
Drop a comment below — even just "yes please!" is enough. If enough of you want it, I'll test it properly in my Dubai kitchen and add the full method here with exact temperatures and timing.
📲 Follow along on Instagram for more recipes.
Easy Tawa Naan — Soft Plain Naan Without Yeast
Equipment
- Skillet
Ingredients
Naan Dough
- 2.5 cups all-purpose flour (maida) The foundation. All-purpose flour gives the characteristic soft, slightly chewy naan texture. For a wholemeal version, substitute up to half with whole wheat flour (atta) — the naan will be slightly denser with a brownish color.
- ½ teaspoon Salt Seasons the dough and adds structure. Add to the flour before the wet ingredients — never directly onto the baking powder as salt can reduce its effectiveness if they come into direct contact.
- 1 teaspoon Sugar Not added for sweetness — the naan will not taste sweet. Sugar accelerates the gentle fermentation process during the resting period and helps the surface brown more evenly on the tawa. Do not skip.
- ½ teaspoon Baking powder The leavening agent in place of yeast. Creates air pockets in the dough during resting and cooking that expand on the hot tawa, giving the naan its characteristic puff and slight chew. Use exactly ½ teaspoon — more makes the naan taste slightly chemical, less and it won't puff properly.
- 1 tablespoon oil (vegetable or neutral) Coats the gluten strands in the dough, keeping the naan soft and preventing it from drying out during the resting period. Use a neutral oil — olive oil is too strong a flavor for plain naan.
- 1.5 tablespoons plain yogurt, full-fat The most important ingredient for softness. Yogurt tenderizes the gluten strands in a way that water alone cannot, giving the naan its pillowy interior and slight tang. Full-fat yogurt only — low-fat yogurt has less tenderising effect and produces a slightly tougher result.
- ¾ cup cup warm water, added gradually (180 ml) Based on the 2:1 flour-to-liquid ratio — 2.5 cups flour needs approximately ¾ cup total liquid. Since yogurt contributes some liquid, warm water makes up the rest. Add gradually, one tablespoon at a time — the exact amount varies by flour brand and kitchen humidity. The finished dough should be soft, smooth, and slightly tacky. Not wet, not stiff.
Finish
- Few drops water (for wetting one side of shaped naan) Patted or brushed onto one side of the shaped naan before it goes onto the tawa. This wet side goes face down against the hot surface. The moisture creates an initial burst of steam inside the dough that puffs the naan from within while the tawa sears the base. This technique is what separates tawa naan from just flat bread on a pan.
- 1 tablespoon butter or ghee, melted (for finishing) [optional] Brush within 30 seconds while still steaming. Cold naan + butter = butter sitting on top. Hot naan + butter = butter absorbed into the surface.
Instructions
Make the dough
- Combine dry ingredients:In a large mixing bowl, add all-purpose flour, salt, sugar, and baking powder. Whisk together briefly so the baking powder distributes evenly through the flour. Uneven baking powder creates bitter spots in the finished naan — this 30-second step prevents that completely.
- Add oil and yogurt:Add the oil and yogurt to the flour mixture. Use your hands to crumble everything together until the mixture resembles rough, sandy breadcrumbs. This pre-mixing step distributes the fat and yogurt evenly before water is added — making the dough come together faster and more consistently when you begin kneading.
- Add water gradually and knead:Begin adding warm water — start with ½ cup and add more a tablespoon at a time as you knead. Work the dough continuously for 10–15 minutes until smooth, soft, and slightly tacky. It should spring back slowly when you press it with a finger. Stop adding water when the dough feels soft and pillowy — not wet and sticky, not tight and stiff.
- Rest for 1–2 hours:Lightly brush the dough ball with oil, place back in the bowl, and cover tightly with plastic wrap or a damp kitchen towel. Rest in a warm, draught-free spot for a minimum of 1 hour. 2 hours gives noticeably better results — the baking powder reaction continues slowly during the rest and the gluten relaxes completely, making the dough easy to roll and the naan more tender. I keep mine in a switched-off microwave — consistent warmth, no draughts.
Shape
- Divide and form balls:After resting, turn the dough onto a lightly floured surface and knead gently for 2 minutes until smooth and elastic. Divide into 6 equal portions and roll each into a smooth ball. Keep the balls you're not using covered with a damp cloth — they dry out and form a skin within minutes of being exposed to air.
- Shape each naan:Using your hands (preferred) or a rolling pin, flatten each ball into a rough oval or teardrop shape — approximately 8–9 inches long and about ¼ inch thick. Use minimal dusting flour — just enough to prevent sticking. Irregular edges and uneven thickness are traditional, not mistakes. Perfectly uniform naan was made by a machine.
- Wet one side:Pat or brush a thin, even layer of water onto one side of the shaped naan. This becomes the side that goes face-down against the hot cooking surface. The moisture creates an initial burst of steam inside the dough that puffs the naan from within while the surface above blisters and chars from the heat.
Cook (choose method)
Cooking Method 1 — Tawa Gas (Priority 1)
- Preheat tawa on medium-high for 3–4 minutes:Place your cast iron tawa or heavy iron skillet over medium-high heat for 3–4 minutes until very hot. Test by flicking a drop of water onto the surface — it should evaporate immediately on contact. Do not add any oil to the tawa.
- Cook the first side — 60–90 seconds:Place the naan wet-side down onto the hot dry tawa. Press lightly with the back of a flat spoon for the first 10 seconds to ensure full, even contact. Cook on medium heat for 60–90 seconds. You will see bubbles forming across the surface and the edges changing from translucent to opaque. The underside should have golden-brown spots.
- Invert over gas flame — 30–60 seconds:Using thick oven gloves, grip the tawa handles firmly with both hands. In one confident motion, flip the tawa upside down over the gas flame. Hold it 5–8cm above the flame. Move the tawa in a slow, steady circular motion so the heat reaches every part of the naan surface evenly. Cook for 30–60 seconds until the surface blisters and develops dark char spots in places.
- Remove and butter immediately:Return the tawa to upright position and remove the naan with tongs. Brush immediately and generously with melted butter or ghee while still steaming hot. Stack on a plate and cover with a clean kitchen towel while you cook the remaining naans.
Cooking Method — Tawa Electric/Induction
- Preheat tawa on high for 3–4 minutes:Place your skillet on the highest setting for 3–4 minutes until very hot. Test with a water drop — it should evaporate immediately. No oil on the pan.
- Cook first side — 1–2 minutes:Place naan wet-side down on the hot dry skillet. Press lightly for 10 seconds. Cook for 1–2 minutes until bubbles form across the surface and the underside has golden-brown spots. Don't move the naan during this time.
- Flip and cook second side — 1–2 minutes:Flip using tongs. Cook the second side uncovered for 1–2 minutes until golden spots appear. For extra puff: place a lid over the skillet for the final 30 seconds. The trapped steam mimics some of the direct heat effect from the gas flame method.
- Butter finish immediately: Brush generously with melted butter or ghee the moment the naan comes off the skillet. Cover with a kitchen towel while cooking remaining naans.

Trish
How can you not provide the quantity of WATER to add in the recipe.? We are supposed to know?? What is the texture of the dough? Please clarified all this for us so we can make your recipe who look/seam divine! Thank you Trish
Hinz
Hi Trish,
thank you for pointing this out — you're absolutely right, and I apologise for the oversight. The water quantity should always be listed clearly in any recipe.
For this recipe: use approximately ¾ cup (180ml) of warm water for 2.5 cups of flour, added gradually while kneading. The general rule is a 2:1 flour-to-liquid ratio — since the yogurt already contributes some liquid, the water brings the total to the right consistency.
The finished dough should feel soft, smooth, and slightly tacky — not stiff, not wet. If it feels firm or dry, add water one teaspoon at a time and continue kneading. The softness of the dough is the most important factor for fluffy, pillowy naan.
I've also updated the recipe card above to include the exact water quantity so future readers won't hit the same question. Thank you again for flagging it — this kind of feedback genuinely makes the recipe better for everyone.
Happy cooking! — Hina 🙂
Hinz
Update: I'm actively testing the air fryer version this week — will add the results here soon! Drop your questions below."